How To Add Animated GIFs To Your Windows Background Using Rainmeter:- Let’s say you want to add the following GIF into your desktop background:
You might say that the “want” will remain a want as you have already tried 100 times to achieve the same. Well, it’s time to redraw your conventions. Using the Rainmeter application, you can easily add any number of GIFs into your Desktop background. Dive into the article to learn how to hack this simple trick.
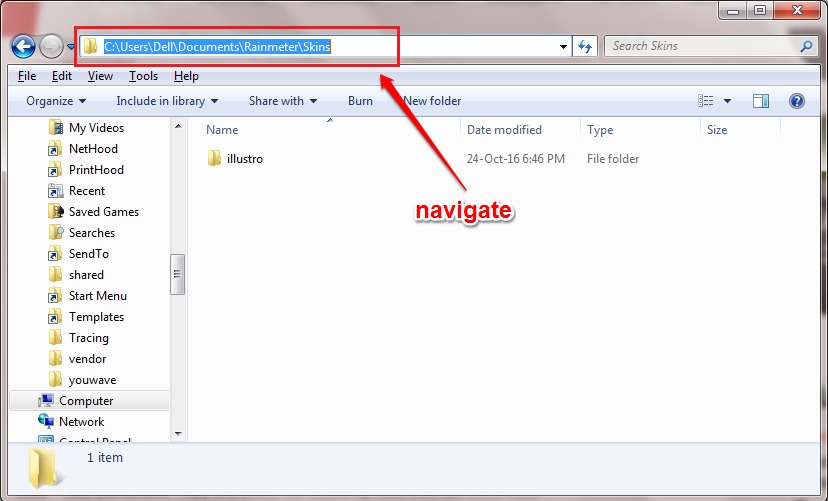
STEP 1 – Install Rainmeter software from here!. Follow the defaults for installation. Once you have installed the software, you need to navigate to the following location on your Windows machine:
C:\Users\%username%\Documents\Rainmeter\Skins
STEP 2 – Once you are in the Skins directory, create a subfolder. Give this folder a name of your choice.
STEP 3 – Now double click on the newly created folder and open it. Create a new text document here by right clicking on an empty space, then on New and then Text Document.
 STEP 4 Copy-paste the following code into your newly created text document:
[Rainmeter]
Update=45
[ImageNumberCalc]
Measure=Calc
Formula=Counter % [*]
[ImageMeter]
Meter=Image
ImageName=#@#[GIF Folder Name]\frame_[ImageNumberCalc].gif
AntiAlias=1
DynamicVariables=1
W=300
H=
PreserveAspectRatio=1
Change the parameter [GIF Folder Name] to the name of the folder that you have created under the Skins directory. In my case, the name of the folder would be merabheja as my folder has that name. If you have any doubts, please refer to the following screenshot.
STEP 5 – As next, save your document. It’s better to give the file the same name as the newly created folder. Give the extension of the file as .ini.
 STEP 6 – Now in the same directory where your .ini file is, create a new folder and name it as @Resources. Double click on it to go inside it.
STEP 7 – Create a new folder inside the @Resources folder. This newly created folder should have the same name as the folder that was created in the beginning under the Skins directory. So in my case, the name of the folder would be merabheja.
STEP 8 – Now it’s time to copy the gif file that you want to be placed on your desktop to the newly created folder.
STEP 9 – As next, we need to split this gif file into individual gif files. For that, go to the site ezgif.com. Once the site loads, click on the Choose File button to browse for your file on your PC. When you are all set, click on the Upload button.
 STEP 10 – Click on the Split It button when the gif file is fully uploaded.
 STEP 11 – When the splitting process is over, click on the Download frames as ZIP button. Save the .zip file to the location where you have moved the original zip file to. In my case, it would be ../@Resources/merabheja
 STEP 12 – Extract the zip file. Delete the original gif file and the downloaded zip file. Now only the frames would remain in the folder as shown below.
 STEP 13 As next, rename the individual gif files. They should be in the format frame_[number].gif. This is the format specified in our .ini file and hence it should be strictly followed.
 STEP 14 Count the number of frames you have. Add 1 to it. Suppose I have 6 frames as shown in the screenshot above. Then my count would be 7, not 6. Now open your .ini file and replace the [*] part in the line Formula=Counter % [*] with your count. Take the following screenshot as reference. Don’t forget to save the .ini file once you are done.
 STEP 15 Now open the Rainmeter application by clicking on its icon.
 STEP 16 First of all, click on the Refresh All button at the bottom of the window. As next, locate your folder and expand it to view your .ini file. Click on it. As next, click on the Load button in the right pane of the window.
 STEP 17 There you are! Enjoy your GIF-ified desktop!!
You can add multiple gif files as well to your Desktop background. For that, you need to create different folders under the Skins directory with different .ini files. Hope you found the article useful. If you have any doubts regarding any of the steps, please feel free to leave comments, we would be happy to help. Stay tuned for more useful tricks, tips, and hacks.


