If you are owning a PC of your own, it is quite natural to have various private files and folders in it. We do lock our PC as a whole, but we do not regret lending them to our friends when they ask for it. All is well as long as they use it for browsing web or watching movies which is alright with you. If you fear about your private data being exposed, then let me tell you, there are also ways to lock specific files and folders. If you search the web, there are variety of third party apps to lock folders are out there that might help you. But most of them make use of Internet Connection which might not be readily available at all times.
How then, can you prevent your private data from being seen by others? That are certain tricks which can be explored if you are a Windows 10 user. Here, I provide you two different methods to accomplish our need.
METHOD 1: Encrypting Files on your System.
Encryption is the process by which the normal data is transferred in to a form not easily readable by other people. This is usually done is case of passwords to prevent stealing them. In windows, encrypting files is done by associating an encryption key with them. But these files can be easily opened up and mailed up by applying your password whereby they will be decrypted. Locking up of files by this method is available only for Windows Pro users. Let us see how it is done.
STEP 1
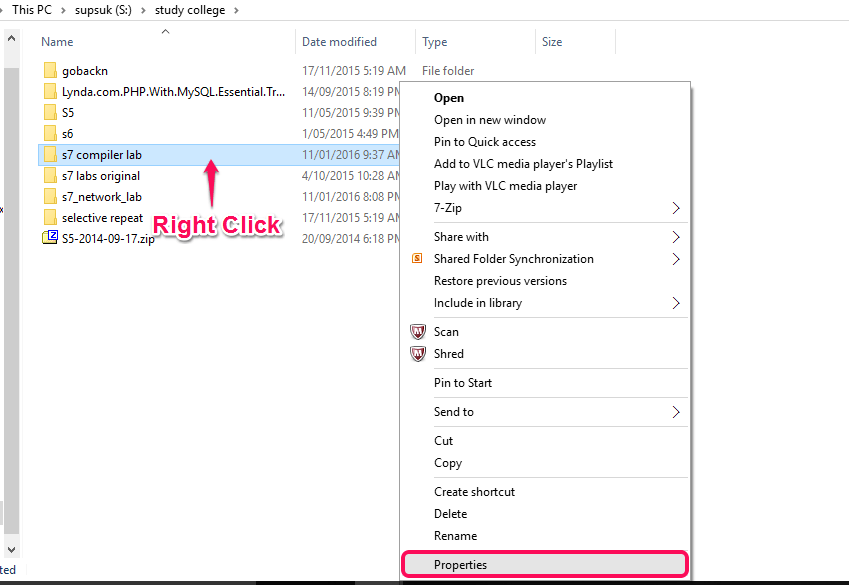
Right click on the folder you would like to lock and choose the option Properties from the menu.
I want to secure the folder named s7 compiler lab. So I choose it.
STEP 2
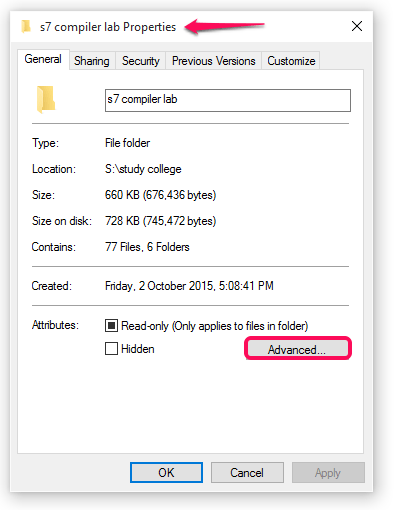
On the window that pops up, choose the option Advanced as shown in the screenshot below.
STEP 3
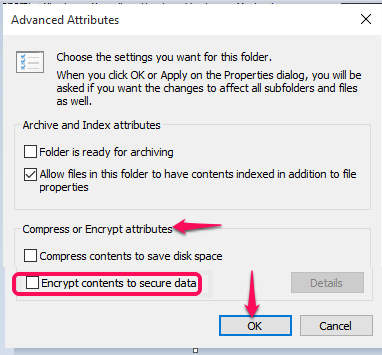
Again a window pops up. Here, you will find an option that says, Encrypt Contents To Secure Data under Compress and Encrypt attributes. Check the box to its left and click the OK button.
STEP 4
To add more users to add for viewing the file, you need to click the Detail button in the current window. This opens up the User Access window where you can add new users by clicking the Add button as shown below.
METHOD 2: Creating New Users And Associating File Permissions.
Just create a user account for the person who would like to have your PC. Following that, you can choose the files and folders you don’t want them to view and finally, deny permissions to access them.
STEP 1
To create a New user account, open up the Control Panel and choose the option User Accounts from its window.
STEP 2
In the next window, towards the right pane again you will find the option User Accounts. Clicking on it will open up the window shown below. Choose the option Manage Another Account from here.
STEP 3
In the next window, you will find the option Add a new user in PC settings. Click on it.
STEP 4
Once it opens up in the Settings, choose the option Add someone else to PC and finish up the process of creating a new account.
STEP 5
Now, bring all the data to be protected in one folder, right click on the folder and choose Properties.
I have chosen my Documents Folder where all data are brought in.
STEP 6
In the window that pops up, choose the Security tab, under which you will find the option Edit.
STEP 7
On the window that emerges out, you will find an option Add. Click on it to Add the user account you had created just now. Click on the option Check Names hit the OK button. Your username in correct path format will get displayed on screen. Now, press Ok button.

STEP 8
Now, allow all file permission while selecting this user from the list.

Finally , deny permissions for rest all users (All other users) and hit the Apply button. That’s it.
That’s it. Now you needn’t fear of your security of your private data. Hope you found this article useful!


