Chrome is the most preferred form of browser among many of us. What makes it such appealing is it’s user friendly interfaces, faster browsing experiences, and ease of access. But at the same time, security is a major concern while browsing through various web pages. When you are using the wi-fi network provided by third party organizations, there are chances that the information might get stolen. Chrome warns you whenever it finds out any abnormal tracks taken while you browse things on the web. The following message arises when your credentials and data hit the spy’s eyes.
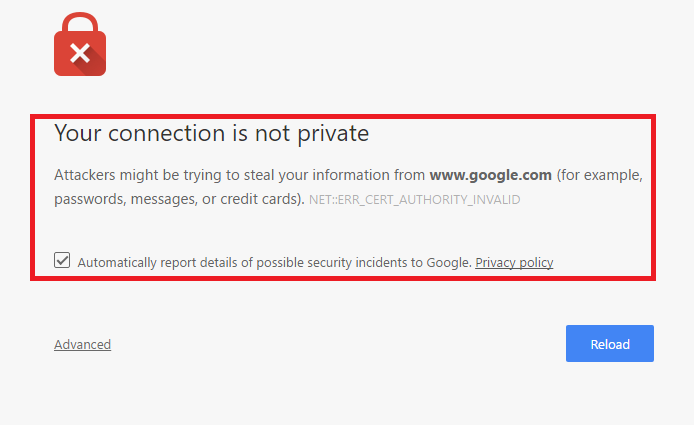
Your connection is not private
Attackers might be trying to steal your information from www.xxx.com (for example, passwords, messages, or credit cards). NET::ERR_CERT_AUTHORITY_INVALID
The Secure Socket Layer(SSL) is a feature that helps the web pages to protect the details you enter into them. Whenever your net connection can’t load those web pages in a protected mode, then such an error arises and there are more chances of attackers creeping into your data.Before getting into the details of solving the issue,let me tell you some events that might have caused the SSL error to occur in your Google Chrome.
- Whenever the certification of SSL for that particular site is not provided by a TTP(Trusted Third Party).
- Whenever the method of communication between your internet connection and the browser which you are currently on, is not protected.
- Google fails to verify the certificate from a Trusted Third Party as it is not maintained up-to-date.
Let me now get on to the various methods that can help you out with the Insecure Connection Error.
Method 1 – Try Incognito mode
Sometimes opening the website in incognito mode works.
1. Open Chrome.
2. Press CTRL + SHIFT + N keys together from your keyboard to open chrome in incognito mode and try opening the website again.
Method 2 – Clear SSL cache
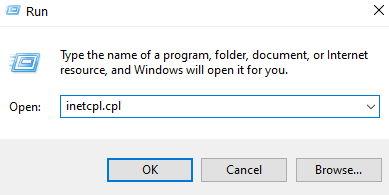
1. Press Windows key + R key together to open run.
2. Now, type INETCPL.CPL in it and click OK.

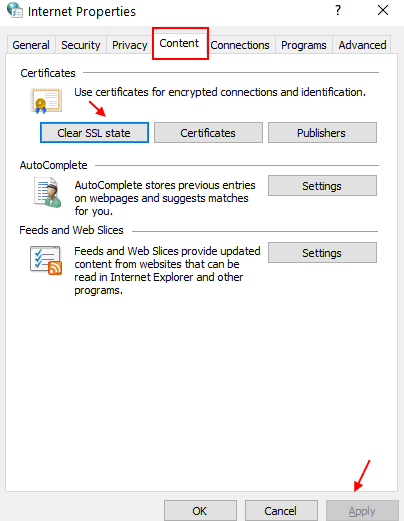
3. Now, Click on Content Tab.
4. Now, click on Clear SSL state.
5. Now, click on Apply.

Method 3 – Just ignore the message and choose to proceed
Just click on advanced and it will expand .

just click on proceed to the website.

METHOD 4 – Check time and date settings
1. Press Windows key + R key together to open run.
2. Write timedate.cpl in it and click OK.

3. Now, Check your date and time and if its not correct, change it.
4. TO change time accurately , Click on Internet time
5. Click on Change settings.
6. Now, click on Update Now.

Method 5 – Clear browsing data of chrome
Just Go to Settings → Show advanced settings → Clear browsing data under Privacy options.
METHOD 6
Get Rid Of Warning Messages
In order to avoid any warning messages that appear on your screen, follow the steps below.
- On the address bar, you find at the top of the browser, type the phrase chrome://flags.
- You will find a window with a variety of options popping up. Scroll down to find the option Remember decisions to proceed through SSL errors for a specified length of time.
- You will find a drop down menu below it. This lets you choose the period of time for which the warning messages doesn’t appear on the browser.
Try out the above given methods to help you out with this problem. Hope you found the article useful!
Method 7 – Check the Antivirus Software
Sometimes antivirus programs block the website’s security certificate and in result you face “your connection is not private” error on Web browsers. Here’s what to do:
- In Avast Free Antivirus, go to Settings → Active Protection → Web Shield → Customize, and finally uncheck the “Enable HTTPS scanning” box.
- In Bitdefender antivirus software, firstly open the main interface of Bitdefender and then go to Settings. Click on Privacy Control → Antiphishing tab → turn OFF the Scan SSL.
