Windows 10 has not only proved its’ stand in the field of newer applications and enhancements over its previous versions, but have also made itself move on to the innovations of wireless networks. Users of today opt on to using wifi rather than the older systems of broadband or any other wired connections. When the proportion of these users elevates in a gigantic manner, it has become even more important to secure your system from outbound viruses and hackers. When your system gets connected to a wi-fi network, it is more easier to have a faster browsing experience. But then, whenever you turn on the wi-fi in your system, a series of wi-fi networks available around you starts getting visible. Most of them require a password to get connected to. This becomes unnecessary when you can connect to only one network at a time .Also,you wouldn’t want any other networks to be shown on the Available Networks part. The new version of Windows launched by the Microsoft allows us to decide which networks you want to be shown and which you need to hide from the category of Available Networks.
This can be accomplished by following the steps which are provided below.The series of SSID that becomes visible as a tile on the Wifi settings area on your taskbar will now only show your network, as you had individually decided for each network,whether to show them or filter them out.
Filter Networks Shown On Your Wifi Settings
Step 1:
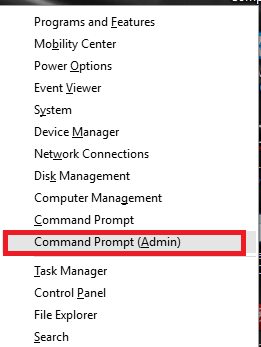
Long press the Windows key + X when the Power user menu pops up on your screen
Step 2:
Out of all options available in its menu, choose the option Command Prompt ( Admin)
Step 3:
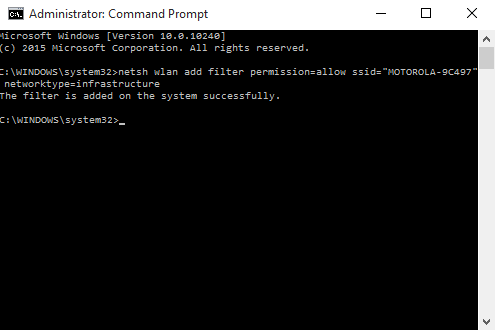
In order to add the networks to your allowed list, copy the names of those networks. And then type the following phrase given below in the command prompt and hit Enter.
netsh wlan add filter permission=allow SSID= ” the name of the SSID you want” networktype=infrastructure.
the name of the SSID you want should be filled appropriately with your network name.
Step 4:
Repeat the command given above one by one for all the networks you want to have in your allowed list.
Step 5:
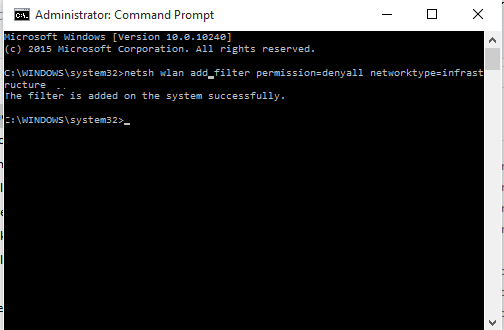
To completely block the wireless adapters which you don’t own or you want to simple hide them , type the following command and hit Enter.
netsh wlan add filter permission=denyall networktype=infrastructure.
Step 6:
From now on only those networks you had wanted will show on your wi-fi settings area and all others will be hidden.
Step 7:
Now,if you want to revert back to your old settings and remove all the filters off, especially when you are travelling, then I would recommend you to turn off the filter option.You can do so by typing in the following command in command prompt and hitting Enter.
delete filter permission=denyall networktype=infrastructure.
The setting will now be back to normal.


