This post is about a few simple options that Gmail provides which every Gmail user will find helpful. Be it about organizing your account in a better way or to work faster with Gmail, these hacks are quick and easy to follow!
Read: Use Gmail offline to use it without internet
#1 – Undo Send
Gmail allows you to unsend an Email upto 30 seconds after you have hit the Send button. Here’s how :
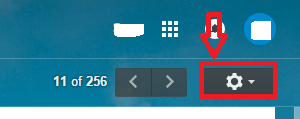
- Open Gmail. Click on the gear button at the top-right corner of the window.
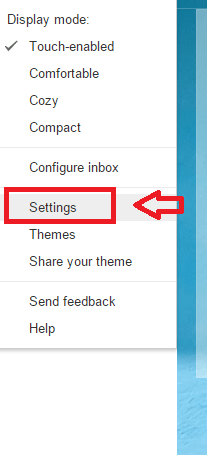
- Click on Settings.
- Scroll down to find Undo Send option. Mark Enable Undo Send field. Set the delay to the time you wish. You can set to a maximum delay of 30 seconds.
- Click on Save Changes at the bottom of the page and you’re good to go!
#2 – Show Unread Messages
Imagine you are browsing something important in the browser. At the same time you’re eager to know if you have any new Email. It’s a messy task to toggle between your Gmail tab and browser tab. Gmail has an option to show your unread Email count. Enable this option and you can see the number of unread mails in your browser tab. This saves a lot of your time! Follow the steps below :
- Click on Settings in the gear button.
- Select the option Labs.
- Scroll down to spot the option Unread message icon. Click on Enable. Click Save Changes.
Your browser tab will now show the number of unread emails. So you don’t have to check every moment if you’ve a new email.
#3 – Keyboard Shortcuts
Gmail has some stunning keyboard shortcuts that can save your time. It will also make you work like a pro! c can compose a new Email. d composes Email in a new tab. Similarly a enables reply all option. Aren’t they simple? Here’s how to enable them on your Gmail.
- Once again open Settings.
- In Keyboard Shortcuts, mark the field corresponding to Keyboard shortcuts on.
#4 – Filtered Email Search
We all know the search button in Gmail. But this option has enhanced search options that let you customise your search further. See the steps below :
- Click on the drop-down arrow at the right end of the search box.
- Click on the type of mailbox in which you want to search (i.e. Inbox, Sent, Drafts etc). Fill in at least some of the filter options. Click on the lens icon.
You’ll get filtered results. This is pretty helpful if you are searching for a mail from a frequent client. In this case simply searching the mail address would show many results. So the filtered option comes to rescue.
#5 – Filter Messages
This feature introduces an amazing option that Gmail has which lets you to filter messages before even reading them. It’s pretty handy when you have newsletters, promotion mails from specific people. You can get them sorted under different tags. Here’s how :
- Open the email you wish to label. Click on the drop-down icon at the top-right end. Click on Filter messages like this.
- A window pops up. Click on the link that says create filter with this search at the bottom.
- Mark the box that says Skip the Inbox. Click on the field next to Apply the label. Click on New Label.
- Give a name to the label. Click on Create.
There you go! Now you’ll have mails from this particular client all under one roof. Isn’t it cool?
Try these features out and tell us which one you liked the most!


