Many users Users who have upgraded to creators update have started experiencing a new kind of problem. When they shutdown the PC, the PC goes to a black screen mode and won’t shutdown. The power light remains on and they have no other option than to do a forced shutdown. Here is the fix.
Fix 1 – Turn off fast startup
Step 1 – Open settings by pressing windows key + i .
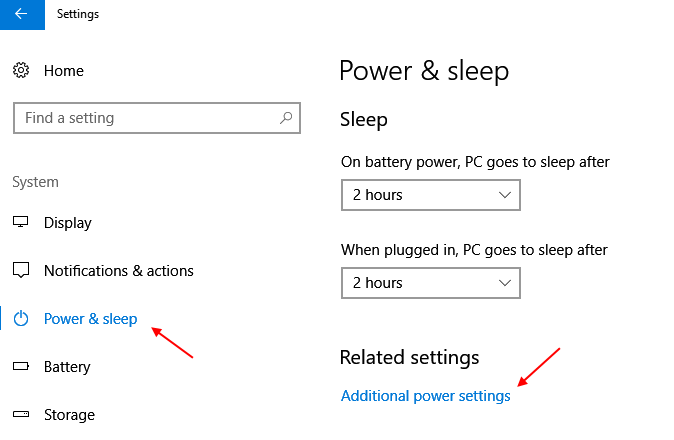
Step 2 – Now, click on system
Step 3 – Click on power & sleep.
Step 4 – Now, click on additional power settings.

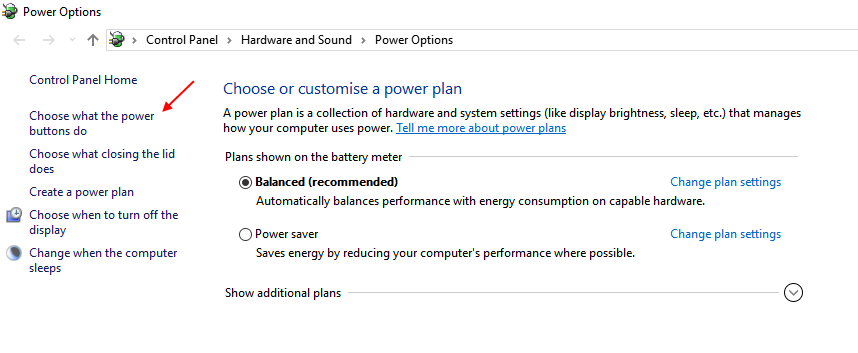
Step 5 – Now, click on Choose what the power buttons do from the left menu.

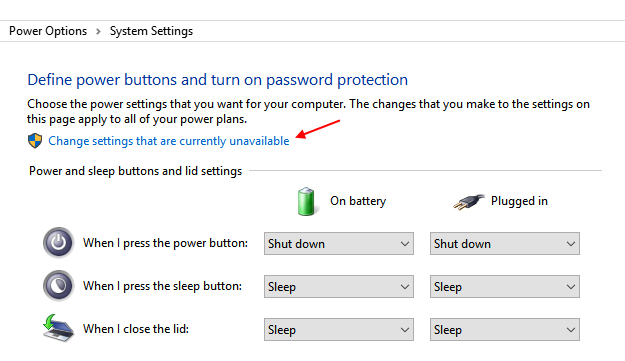
Step 6 – Click on change settings that are currently unavailable.

Step 7 – Now, Uncheck turn on fast startup . Finally, click on save changes.

Now, shutdown your PC. You are welcome.
Fix 2 – Complete shutdown using command
Step 1 – Open command prompt as admin
Step 2 – Now , run the following command given below.
shutdown /s /t 5
This command tells your PC to skip the hybrid shutdown and shutdown the PC completely.
Note – For rebooting the PC use shutdown /r /t 5
Fix 3 – Disable Intel (R) Management Engine Interface
The real culprit is Intel (R) Management Engine Interface version 11. You must go back to it’s 9 or 10 version to fix the shutdown issue. But the problem is whenever you will uninstall version 11, it will update itself to latest version,
So, here is how to rollback to the Intel (R) Management Engine Interface previous version.
Step 1 – Download Intel (R) Management Engine Interface driver version 9 or 10 from intel website depending upon your laptop model. It is better if You will download the right driver (Version 9.5.24.1790 1.5M ) depending upon your laptop model from your laptop manufacturers website.
Step 2 – Now, press windows key + r to bring run command box and now write services.msc in it and hit enter to open services manager.
Step 3 – Now, find windows update from the list. Double click on it and choose startup type as disabled from the dropdown. Now, press stop and finally click ok.
Step 4 -Now, install the downloaded Intel (R) Management Engine Interface driver (Old version). You do not need to uninstall version 11 as when you will install the older version, it will overwrite newer version automatically.

Step 5 -Press yes and complete installation.
Step 6 – Now, download windows 10 show or hide updates tool from Microsoft. Now, run the troubleshooter and hide updates to the Intel Management Engine Interface (MEI) Driver.

Step 7 – Now, change back again windows update service to automatic.
Step 8 – Reboot and have a peace of mind. You are welcome.
This fixes the improper shutdown problem in most brand laptops.