When if first installed the new Windows 10, I was quite pleased with the operating system. I liked all the new features and modifications and grew especially fond of the new mail app.
I liked how it was laid out and how clean were my mails, I also liked the notifications, it could send me. The experience was great until the mail app hit its first obstacle. After weeks of proper and use and workflow, my mail app suddenly decided to give up once i hit the Refresh/Replay button, it simply crashed.
I tried to fix it, restart my Pc, clean up files, all the shenanigans, none of them worked. The mail app refused to open/ run, which completely destroyed my experience of it.
Also read: – Best Free Desktop Mail apps for Windows PC
I had to go through three trial and error methods before I found my fix, after a lot and a lot of searching. You can go through all the three fixes one by one and see which one works for you.
Since the source and cause of this bug is not yet found, there is no sure shot fix for it. You will have to try various different methods And hence you can see for yourself which of the three fixes works for you.
Method 1 – Reset Mail and Calendar App
1. Press Windows Key + I together to Open Settings.
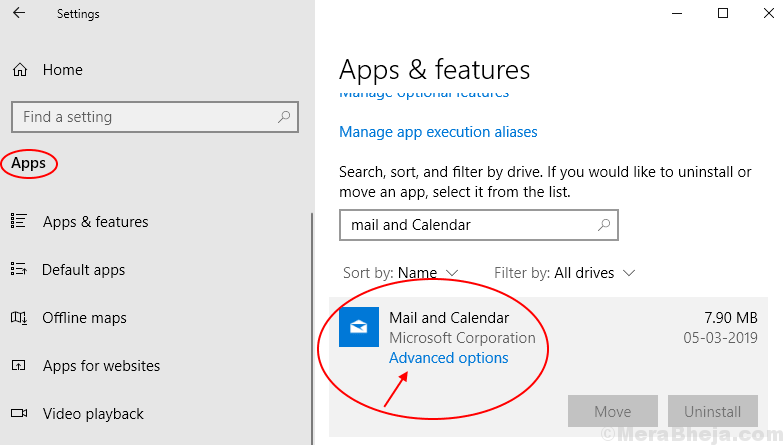
2. Now, Go to Apps.
3. Search Mail and Calendar App from the list.
4. Click on Mail and Calendar App to expand it.
5. Now, Click on Advanced options.

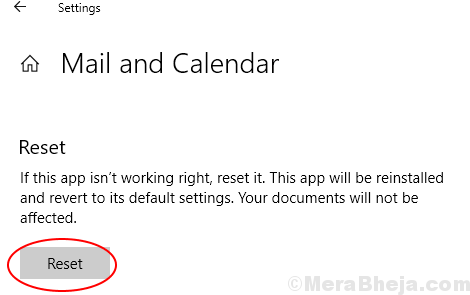
6. Click on Reset to Reset Mail and Calendar App.

Method 2 – Reinstall Mail app in Windows 10
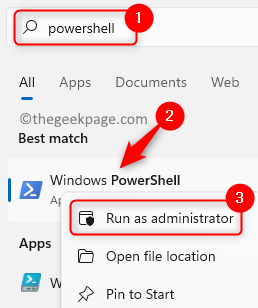
1 – Search Powersehll in Taskbar search. Right click on the search result and then click on run as administrator to Open Powershell as admin.

2 – Now, type the following command in Powershell to remove mail and calendar app from your System.
get-appxpackage *microsoft.windowscommunicationsapps* | remove-appxpackage
3 – Now, open windows store and install mail app again on your PC.
This will fix all your Mail related problems on Windows 10 PC.
Method 3 – Try To Re-register Mail App with PowerShell
If the troubleshooter does not work,you can try Method 2. But there is no direct way to reregister in the mail app.
Hence you can use a workaround, that will cause you to reregister all built in apps using a command in PowerShell.
Note: Make sure you have closed the Mail app before following the below listed steps.
I have listed the procedure to reregister apps in windows in a few simple and easy steps below, for you to follow
1- Click on the Start button.
2- Click on the Search bar, and search for cmd.
3- Right click on command prompt from the results and run it as Administrator.

4- Enter the following command
PowerShell -ExecutionPolicy Unrestricted -Command "& {$manifest = (Get-AppxPackage *windowscommunicationsapps*).InstallLocation + '\AppxManifest.xml' ; Add-AppxPackage -DisableDevelopmentMode -Register $manifest}"
close the powershell and register the mail app again, once the command finishes running.
Method 4 – Adjust privacy settings
You have to adjust the privacy settings to let apps have access to your calendar.
1. You have to press the Windows key+I keys together.
2. Then, click on “Privacy” settings to access it.

3. On the left-hand side, click on the “Calendar“.
4. At first, click on “Change“. Set the ‘Calendar access for this device’ to “On“.

5. After that, scroll down to check ‘Allow apps to access your calendar’ settings to “ON“.
6. Finally, make sure that ‘Mail and Calendar‘ is turned “ON” in the ‘Choose which apps can access your calendar’ section.

Close the Settings screen and restart your computer. Check if this helps.
Method 5 – Update and Restart pc
1 – Search check for updates in windows search and click on it

2 – Update your PC and reboot it after updating
Method 6 – Turn ON sync in Mail
You have to turn on the synchronization settings in your Mail app.
1. Open the Mail application on your computer.
2. After that, click on the ‘Gear-shaped‘ icon to open the Settings in Mail.

3. After that, on the right-hand side, click on the “Manage accounts” to access it.

4. After that, click on your Email id to access it.

5. Next, click on the “Change mailbox sync settings“.

6. When you see your account settings, make sure in ‘Sync Options’, ‘Email’ is turned “ON“.
7. After that, click on “Done” to enable sync settings.

Close the Settings window.
Method 7 – Turn off Sync settings
You can sync your settings in between your systems.
1. Press the Windows key+I keys together.
2. Click on the “Accounts” settings to access it.

3. On the left-hand side, click on the “Sync your settings“.
4. Next to that you need to switch the ‘Sync settings‘ to “Off“.

After doing this, close the Settings window.
You may reboot your device and check if this helps.
Method 8 – Modify the localization settings
1. Right-click on the Windows icon and click on the “Run“.
2. Type this code in the Run window. Click on “OK“.
control intl.cpl

3. When the Region window opens up, go to the “Administrative” tab.
4. In the ‘Language for non-Unicode programs’ section, click on the “Change system locale…“.

5. Now, select your current system locality.
6. Click on “OK” to save the change.

7. Coming back to the ‘Region’ screen, click on “Apply” and “OK” to save these changes.

After resetting the region settings, restart your system once and check if this helps.
Method 9 – Run DISM check
Run an SFC and DISM check to check if there is a problem with the system files.
1. You need to press the Windows key+R keys
2. Then, type this code and hit Ctrl+Shift+Enter keys together.
cmd

3. Paste this code in the terminal. Thereafter, hit Enter to run the scan.
sfc /scannow

SFC scan will start to check the system files for any errors.
4. In case the SFC scan doesn’t work out or incur any error, paste this DISM command in the terminal, and then hit Enter.
DISM.exe /Online /Cleanup-image /Restorehealth

DISM check may up to 15-20 minutes. After this check completes, restart your computer. Check if this helps you to resolve the issue.
Method 10 – Adjust the owner settings
This problem may occur due to insufficient permissions for the Mail app.
1. Press the Windows key+E.
2. Once the File Explorer opens up, go to this folder location-
C:\Program Files
3. Right-click on the “Program Files” and then click on the “Properties“.

4. When the Properties window appears, click on the “Security” tab.
5. Click on the “Advanced” settings.

6. After that, click on “Change” to change the ownership.

7. After that, click on “Advanced“.

8. Now, click on “Find Now“.
9. After that, select your user name from the list. (For this computer it is “Sambit“.)
10. Click on “OK“.

10. Finally, click on “OK“.

11. Click on “Apply” and click on “OK“.

This should adjust the folder permission to your account.
12. Once you come back to the Program Files window, navigate to this location –
C:\Program Files\WindowsApps
13. In the WindowsApps folder, find out the ‘microsoft.windowscommunicationsapps‘ folders.
14. Right-click on the first one and click on “Properties“.

15. Then, follow the step-4 to step -11 to change the ownership to your account.
16. Make sure to check the “Replace owner on subcontainers and objects“.

17. In the security settings screen, click on the “Advanced” option again. Then, click on “Change permissions” to modify permission settings.

18. In the Permissions entries, double click on the “Users” to edit it.

19. After that, check the “Full control” option.
20. Click on “OK” to save this.

21. Finally, click on the “Apply” and on “OK“.

This will save the change.
21. Now, do the same thing for other ‘microsoft.windowscommunicationsapps‘ directories in the WindowsApps folder.

Once you have done it, close the File Explorer. Restart your computer and check further about the error.
NOTE–
1. On this computer there are only three Microsoft.windowscommunicationsapps directories. In your case, the number of folders may vary.
2. If you are still facing the same issue with the Mail client, try taking ownership of the following folder-
Windows/communications/apps
Method 11 – Disable location settings for Mail and Calendar
Some users have reported solving the issue just by disabling the location access for Mail and Calendar.
1. Press the Windows key+I keys together.
2. When the Settings window opens up, click on the “Privacy” settings.

3. When the privacy settings open up, click on the “Location” on the left-hand side.
4. Here, toggle the “Mail and Calendar” to “Off“.

After doing this close the Settings window. Restart the system once and the Mail should work just fine.
How to Fix Mail and Calendar App Syncing Problem
1. Search CMD in Windows 10 Taskbar Search.
2. Right Click on Command Prompt Icon and Run as Administrator.
3. Now, Run the Following Command Given below and Execute it to fix the syncing problem.
dism /online /Add-Capability /CapabilityName:OneCoreUAP.OneSync~~~~0.0.1.0
The Sync Problem will get Fixed in your Mail and Calendar App on Windows 10 PC.