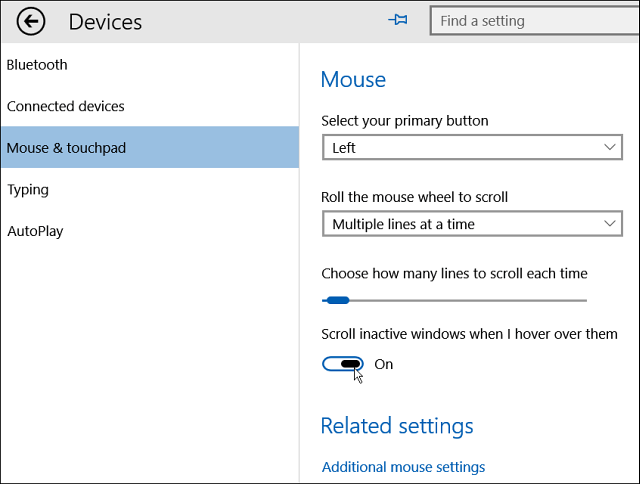
Microsoft has come up with a brilliant feature this time, which we think you might have come across while exploring Windows 10. This feature helps you scroll inactive windows without focusing on them. This is done by just placing the mouse cursor over the inactive window and scrolling it , which leads to opening of the previously used inactive window.For instance, someone has to make a power point presentation by referring a webpage on Chrome. So, he has to open two windows , Chrome and PowerPoint .In Windows 7/8, only one window can be opened at an instant. So users faced the difficulty of switching windows again and again. This problem has now been eliminated in Windows 10.
Now, one can operate the inactive window (which is Chrome here) by moving the cursor on to the window in the taskbar and by scrolling the mouse, the inactive window appears parallel to the current opened window( which is Power Point here). With this, the user can directly put down notes from the Webpage into the ppt.If you have two windows in working mode side to side, and you are currently accessing to a particular window(say, Power Point) for taking notes, you will find this feature very helpful as you can now directly scroll the other window without actually opening it.
Though this is a great feature, some people might not like it and they might want to disable it , as it is enabled by default in the Operating System.
Enabling or disabling window scrolling in windows 10
One can turn on/off this feature by simply following the steps as follows-
1.) Go to Settings by pressing Windows + I keys simultaneously. You can also do so by clicking Settings after pressing the start key on the left side of your PC.
2.) Now, open Devices (Bluetooth, printers, mouse).

3.) In Devices, click on Mouse & touchpad. Settings related to that will open where you can modify them.
4.) A dialog box is there “Scroll inactive windows when I hover over them“. Disable it by marking it OFF.

To enable it , you can turn it ON.
Alternative method
If you are having any problem in finding above options, then you can use this method also. By changing settings of the Registry Editor, one can have the work done.
You have to just follow the steps as described below –
1.) Go to Registry Editor. You can have access to it by typing Regedit in the search box of the Start Menu. A user account dialog appears asking whether to open the Registry Editor or not. Confirm this by pressing the YES button.
2.) Open the following address from browsing in the left menu-
HKEY_CURRENT_USER –> Control Panel –> Desktop
3.) Find MouseWheelRouting , which is a REG_DWORD type file available on the right side. If you are unable to find it, you can create it (DWORD (32-bit) Value).
4.) Now, when you have found it or created one, double click on MouseWheelRouting entry to open it.
5.) A dialog box named “Edit DWORD (32-bit) Value” will open. Change the value data to 2 , if you want to enable the inactive window scroll.
If you want to disable inactive window scrolling, enter the value as 0.

6.) Click the OK button.
You are done with this.
This is a very powerful tool introduced by Microsoft, though it has been introduced in Windows after decades, you might now find it very useful. Otherwise one had to add a 3rd party to have this feature.
Hope you found out this helpful for your knowledge into Windows 10.
