Potentially Unwanted Applications (PUA) often land your system in trouble. PUA are those programs which the user downloads without actually knowing why they are downloading it. PUA mostly gets downloaded with a useful application. So the user often is blind about the fact that a PUA is being downloaded. PUA often do not state their purposes completely to the user and has a great potential to damage the computational resources.
Read: 6 best antivirus for windows 10
Windows 10 Enterprise has added an additional functionality to it’s Windows Defender. In this version, the Windows Defender can actually protect your system againt the installation of Potentially Unwanted Applications(PUA). Even though this feature is limited to Windows 10 Enterprise, it can be made availale to Pro and Home users by making some minor changes in the registry entries. Read on, to learn how to turn on the antimalware feature in Windows Defender on Windows 10.
See also: – How to turn on anti adware feature in windows 10 defender
STEP 1
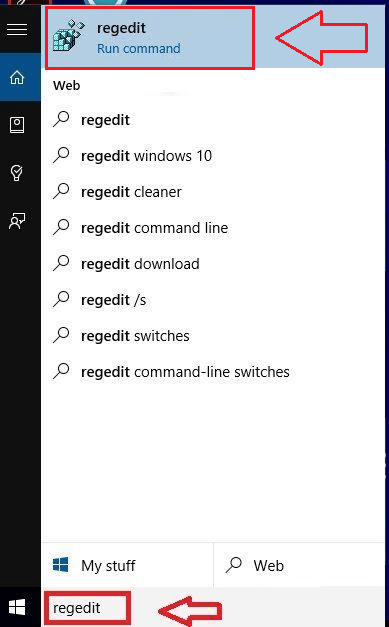
- Click on Start menu and in the text search area, type in regedit. From the search results that appear, click on regedit and run it when asked for confirmation.
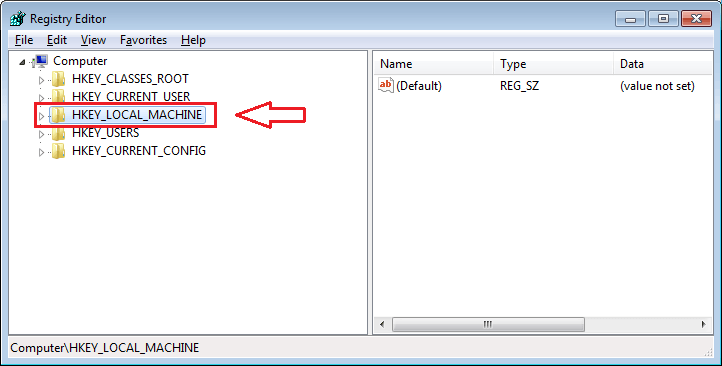
- From the left window pane of the window named Registry Editor, find the entry named HKEY_LOCAL_MACHINE and click on it.

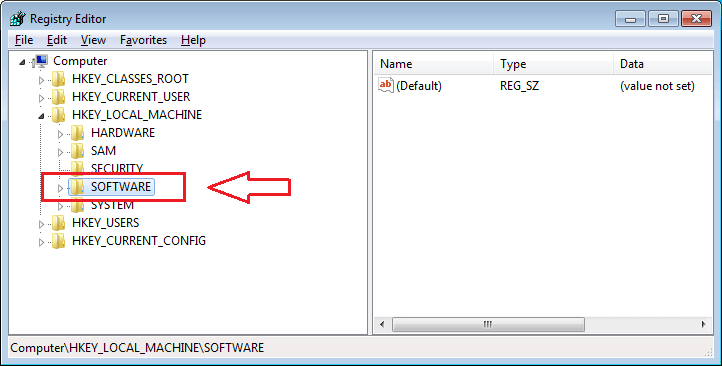
STEP 3 - From the expanded list of options, click on the option named Software.

STEP 4- Browse through the options listed under Software. When you find an option named Policies, click on it to get to the next step.

STEP 5- Under Policies, you will find an option named Microsoft. Click on it.

STEP 6- Next step is to click on the option named Windows Defender under Microsoft.

STEP 7- Next step is to find the option MpEngine. If you find it, click on it. If you can’t find it, right click on Windows Defender, then click on New and then on Key.

STEP 8 - Name the new key as MpEngine and then click on it.

STEP 9- Now in the right window pane, look for a DWORD (It is a 32 bit unsigned integer) named MpEnablePlus. If you find it, click on it. Else, generate one by simply right clicking on the right window pane. Now click on New and then on DWORD(32 bit) Value.

STEP 10- As next, name the newly created DWORD Value as MpEnablePlus.

STEP 11- Double click on the newly created DWORD Value MpEnablePlus inorder to open the window named Edit DWORD (32 bit) Value. Change the value under Value Data from 0 to 1. Then click on Ok. That’s it. Now restart the system to see the changes.

STEP 12- Now open SCEP(System Center Endpoint Protection). Click on the tab History. If you click on the radio button for All detected Items, you will be able to see all the items blocked by Windows Defender. It also tells you the category to which the blocked item belongs, a short description and the action to be taken. Under the Quarantined Items, you can see the Potentially Unwanted Applications as well. Click on Remove all button at the bottom, if you want the blocked item to be removed.
 Yes, turning on the antimalware feature in Windows Defender on Windows 10 is as simple as that. Why go for expensive software when Windows itself will do it for free? Hope the article was found useful.
