The average battery life cycle of a laptop in the recent times hovers around 4 to 5 hours sometimes even longer on the high end laptops . Having a laptop that runs for a considerable amount of time makes life easier . You get your tasks done, finish that project and balance multiple tasks without dragging a charger with you.
Read: How to generate Battery health report
Traditionally we have always and still do rely on third party software to enhance our computer’s performance. Be it to clean up background services, protect our system from malware or viruses, tweak our system’s characteristics there is a tool out there to do it all. Extending your battery life is no exception. Software like TuneUp enhance your battery life and help you get more juice from the laptop.
Windows always offered the functionality to customize you power plan settings. What this meant was that you could tailor a power plan(the plan that customizes how you view your system i.e display brightness, how it should behave in different settings etc.) for a specific need. And with that you could change your battery preferences too.
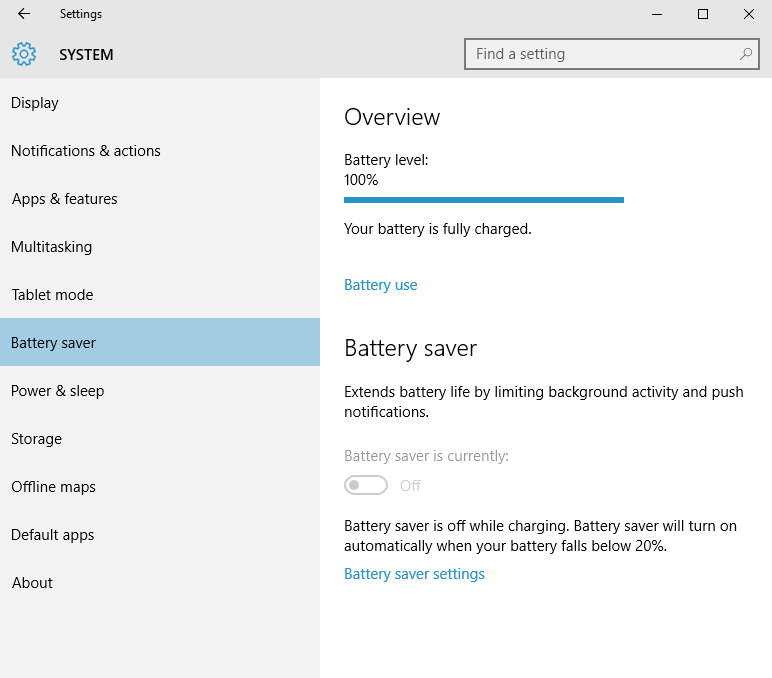
To eliminate these Windows 10 now comes with its very own Battery Saver feature that promises to extend your battery for a considerable amount of time. The Battery Saver feature automatically runs once your battery falls below 20%.This feature can be turned off if desired from the Settings menu.( Win + I ).The Battery Saver serves this purpose by limiting background activities and push notifications.
How can you use this feature? The following steps will walk you through the process :
Step 1 : Open your Settings app ( Win + I )
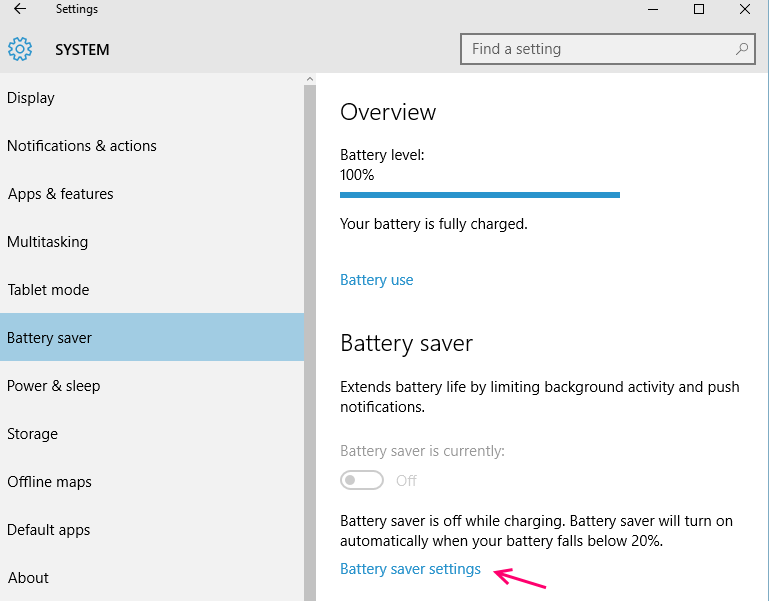
Step 2 : In the Settings App go to System and in the left pane you can find the Battery Saver tab.

Alternatively , just type in Battery Saver in you Windows 10 search bar on the bottom left on your screen.
Step 3 : Enable Battery Saver.
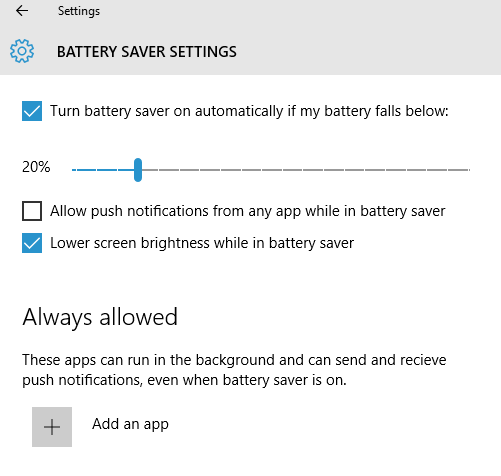
Step 4 : By clicking or tapping on the Battery Saver settings you can tweak the settings to when the Battery Saver should be activated whether at 20 % battery or 30 % or so on.


This feature is made available only when you check the Turn battery saver automatically when power falls below :option.
In addition to the Battery Saver you can also help to extend the battery life cycle on your laptop by choosing what tasks run in the background.This feature can be accessed from you Battery Saver menu directly by :
Battery Saver -> Battery Use -> Change background app settings.

Switch Off the apps that you don’t want running in the background to minimize battery consumption.


If you want to manually enable the Battery Saver feature whilst you’re working on your home screen click or tap on your notification area and click on the battery icon and choose to enable the battery saver feature.

The Battery Saver feature can be tailored to your power plan settings too. Here’s how you can do this :
Step 1 : Go to the Power Options menu from right clicking on the battery icon in the taskbar and selecting Power Options from the list.

Step 2 : A list of your Power Plans is displayed. By default there are 2 plans. Whichever plan you intend to tweak click on it’s Change Plan Settings which takes you to the settings page.

Step 3: Click on the change advanced power settings and navigate to Energy Settings which displays On Battery value.

Lowering this to 0 disables the Battery Saver and giving it a value tells your system to enable the Battery Saver feature when the system’s battery level falls to value chosen by you.
