CompatTelRunner.exe is an application on Windows, which some of the users are reporting having an issue with its very high disk usage. CompatTelRunner.exe or Windows Compatibility Telemetry is an application designed by Microsoft which reports usage and performance data to Microsoft for improving user experience. It runs in the background and some time (especially for low-end computers) it uses a high amount of disk and becomes a reason for very slow boot.
If you want to stop CompatTelRunner.exe using high disk usage, follow these fixes-
Fix-1 Disabling CompatTelRunner.exe with Task Scheduler
You can disable the CompatTelRunner.exe with Task Scheduler. Follow these steps to disable it-
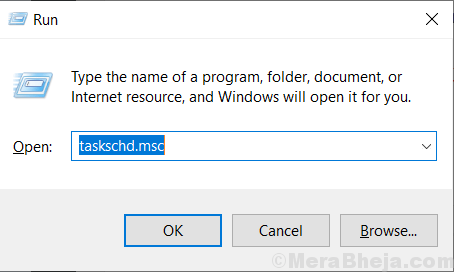
1. First, you will have to press ‘Windows Key‘ and the ‘R‘ key and type “taskschd.msc” and hit enter.

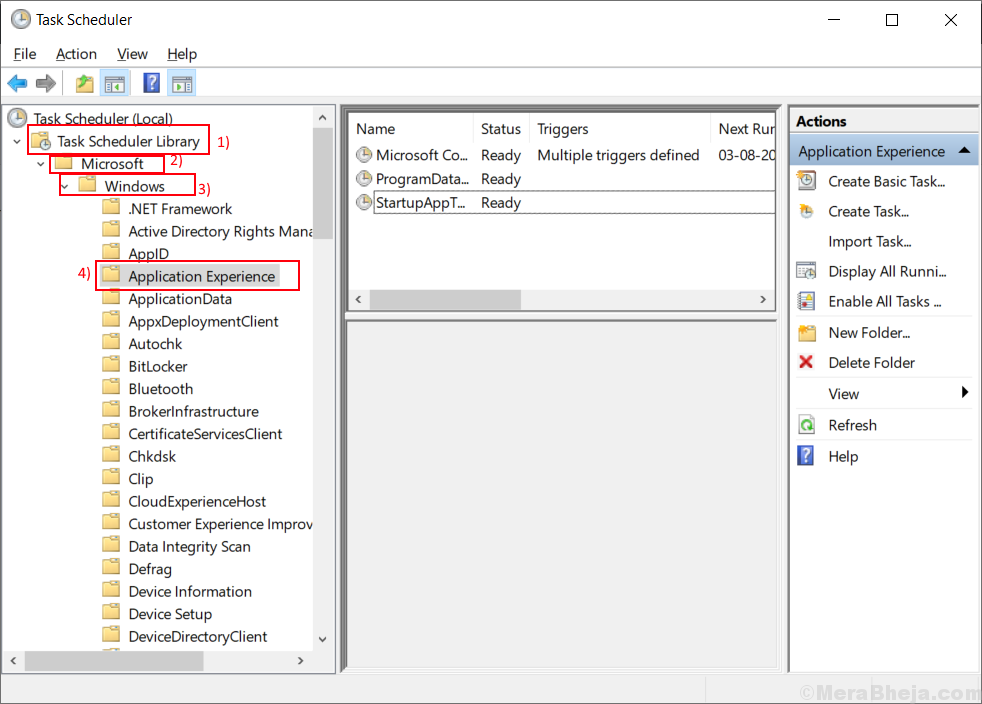
Task Scheduler will be opened.
2. Now click on “Task Scheduler Library” and then click on “Microsoft” and then click on “Windows“. In the drop-down menu of Windows click on the “Application Experience“.

3. Now you will see some tasks on the right pane of “Application Interface“. Right click on the “Microsoft Compatibility Appraiser” and click on the “Disable“.

4. Close the Task Scheduler and reboot your computer. Check if CompatTelRunner.exe is still having high disk usage. If it is still having high disk usage, then go for the next fix.
Fix- 2 Delete CompatTelRunner.exe as an administrator
You can delete the CompatTelRunner.exe as an administrator. Before going for the next step, make sure that you are logged in as an Administrator. Follow these steps to delete CompatTelRunner.exe –
1. Press Windows Key+R and Run window will prevail.
2. Then, type “C:\Windows\System32” and hit enter.

3. Now Click on the Search Tab on the uppermost right corner, type”CompatTelRunner“.
4. Right-click on it and click on “Properties“.

5. Click on the “Security” tab and then click on the “Advanced” tab.

6. Click on the “Change” beside “Owner:“. Now click on “Advanced“.

7. Click on the “Find Now” tab and look for your user name. Select the name and click on “Ok“.

8. Now, click on “OK“.

9. Click on “Apply” and “Ok“.

10. Now you have to right-click on “CompatTelRunner” and click on “Properties“.

11. Go to the “Security” tab. Select the username you have changed ownership to.
12. Now, again select your Username. Check the box beside the “Full control“.
13. Next click on “Apply” and “Ok“.

Close the “Permissions for CompatTelRunner” window.
14. Now look for the “CompatTelRunner” and right-click on it. Click on “Delete“.

Reboot your computer. The problem will be solved. If it is not solved then go for the next fix.
Fix 3 – Disable Connected user Telemetry service
1 – Open Service manager by searching Services in Windows search and then clicking on Services icon.

2 – Double click on Connected User Experiences and Telemetry

3 – Now, Choose Startup Type as disabled
4 -Click on Stop to stop it

Fix 4- Uninstall KB2952664
Windows Update KB2952664 can cause this error. By following these steps you can uninstall KB2952664 from your computer.
1. What you have to do is press Windows key+R together.
2. Then, type “cmd” in the Run window, and then press these ‘Ctrl+Shift+Enter‘ keys together.

2. Type “dism /online /get-packages | findstr KB2952664” and hit Enter.

3. Type “dism /online /remove-package /PackageName:Package_for_KB2952664~31bf3856ad364e35~amd64~~6.1.1.3” and press Enter.

4. Type “Get-HotFix -id KB2952664” and hit Enter. This step is to check if there is any Hotfix error or not. If there is no HotFix error then KB2952664 is deleted from your computer.

5. Reboot your computer and your problem should be solved.