What to do if you are constantly reminded by Microsoft about This copy of windows is not genuine error message. If you have a pirated version of Windows installed in your system, after a while, your desktop wallpaper will turn all black with an error message at the bottom which says your Windows is not genuine. This is quite an annoyance. This error message occurs even if you haven’t activated your Windows after actually paying for it. If that’s the case, you can simply enter the activation key and activate your Windows. But if your copy is pirated, then this won’t be enough. But you can definitely walk through the problem. Read on, to learn how to fix the Windows not genuine error message on Windows 7 using command prompt.
See also: – How to check Your Windows Product Key
Fix Windows not Genuine error message using command prompt
STEP 1
- Click on Windows 7 start menu icon as shown below.
STEP 2
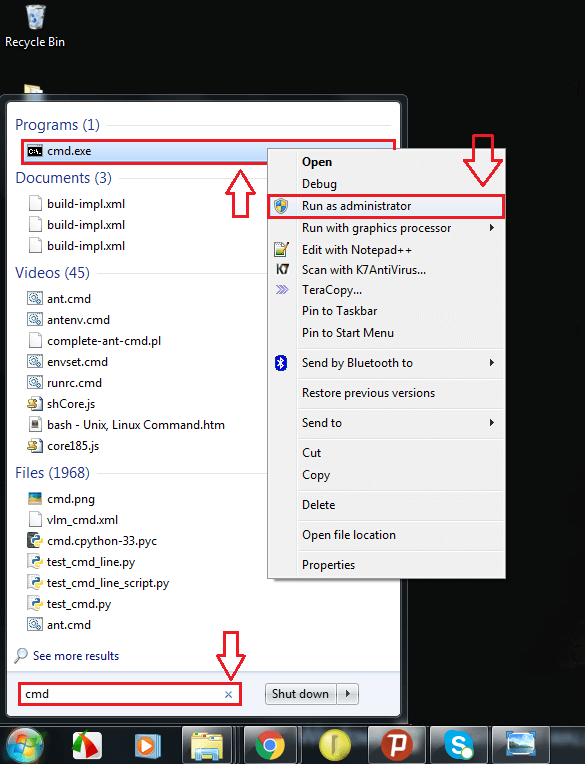
- In the search bar, type in cmd. From the search results that appear, find the one named cmd.exe. As next, right click on cmd.exe and then click on Run as administrator from the context menu.
STEP 3
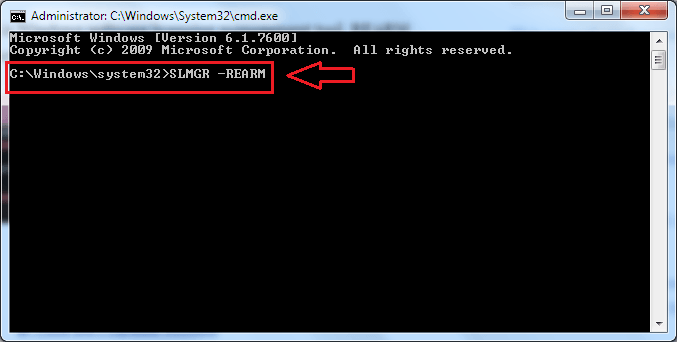
- This will result in the opening of the Command Prompt with administrator privileges. Now type in or copy-paste the following command into the Command Prompt and hit Enter.
SLMGR -REARM
STEP 4
- When asked for confirmation, click on OK button. Restart your PC for the changes to take over. You won’t see the error message ever again. If at all you happen to see the same error message again, try SLMGR /REARM instead of SLMGR -REARM.
Turn off automatic updates from Microsoft
You can now use your pirated version of windows as if it’s original. But if you want to use it that way for a long period of time, you have to opt not to receive any updates from Microsoft, as Microsoft, along with the updates, installs a file that detects whether your system is genuine or not. Follow the instructions below to prevent that from happening.
STEP 1
- Navigate to Control Panel from the Start menu.
STEP 2
- Click on the first entry, that is System and Security.
STEP 3
- As next, click on the option named Windows Update.
STEP 4
- Now from the left pane of the Window that opens, find Change Settings and click on it.
STEP 5
- Now a new window opens, choose the option Never check for updates (not recommended), from the drop down menu under the section Important updates and click on it. Finally click on OK button.
Uninstall the windows update that causes the error message
But before everything, since your system showed the error message that your Windows is not genuine, the file that detects the genuineness of Windows has somehow managed to install itself via the Windows updates. You have to uninstall that file to prevent it from causing trouble in the future.
STEP 1
- Open Windows Update window exactly as it was opened just before. Now find a link named Installed updates from the bottom of the page and then click on it.
STEP 2
- The previous operation results in the listing of all the recent Windows updates. You have to find the update named KB971033 from this list and delete it in order to eliminate the chances of trouble. Now restart your PC such that the changes can take over.
That’s it. We are done. The point to remember is that all these steps do not actually convert your Non-genuine Windows version to a genuine one. All that it does is suppressing the problems caused by a Non-genuine Operating system. If you want to enjoy all the features available in the Genuine Microsoft Windows versions, buy a genuine version of Windows from Microsoft Windows store. Hope you found the article helpful.


