MMC or Microsoft Management Console is a Windows app which provides programming framework and GUI (Graphical User Interface). Consoles (collective administration tools) are also created, saved and opened in MMC.
A number of Windows 10 users are facing the problem where this MMC Could Not Create the Snap-in error pops-up with a CLSID folder name. If you are also getting this error, we will help you fix it.
How to Fix MMC Could Not Create the Snap-in
This problem could occur if the snap-in’s registry configuration is broken or if the system files are corrupt. We will try to fix this issue by using our methods. Perform the methods until the issue is fixed.
Fix 1 – Fix the Registry
As registry configuration error can cause this error as well, we will try to fix the registry. Follow the steps to perform this method.
Note: – Before doing anything with registry editor first of all create a registry backup, so that if anything unexpected happens, you can just import the backed up registry file and make everything normal again.
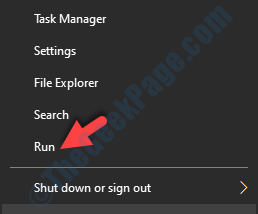
Step 1. Open Run. To open Run, right-click on the Start menu button and select Run.

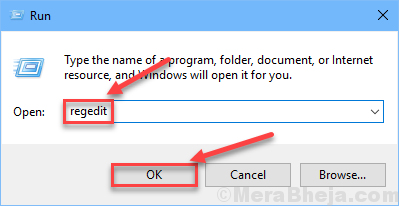
Step 2. The last step will open the Run window. Here, type regedit and click on OK.

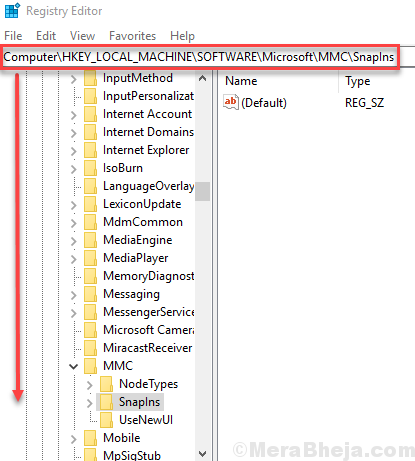
Step 3. The last step will open the Registry Editor. On the left side of the window, follow the following path.
HKEY_LOCAL_MACHINE\SOFTWARE\Microsoft\MMC\SnapIns

Step 4. Double click on the SnapIns folder to expand it.
Now, in the Snapins folder, look for the folder whose name was specified in the error message as CLSID.

Step 5. After finding the correct folder, right-click on the same folder and select Delete.
When asked for confirmation, click on Yes.
Step 6. Now, Restart your computer.
This should solve the problem. If it didn’t, then follow the next method.
Fix 2 – Rename mmc.exe
1. Open file explorer and browse to the following location:-
C:\Windows\System32
2. Now, rename mmc.exe to mmc.exe.backup

Now, try again and see if the issue gets resolved or not.
Fix 3 – Turn On .NET Framework
Turning on Microsoft .NET Framework has worked for most of the users. Follow the steps mentioned below to perform this method.
Step 1 – Search Turn Windows Features On or Off in Windows 10 Search box.
Step 2 – Click on Turn Windows Features On or Off.

Step 2. This will open Windows Features: Turn Windows features on or off in a small window.
Here, mark the box beside .Net Framework 3.5 (includes .NET 2.0 and 3.0). To select its components according to your needs, you can expand it and mark them as well. After that, click on OK.

Step 5. Now, Restart your computer.
This should fix the problem. If the issue is not solved, try the next method.
Fix 4 – Perform System File Checker Scan
We will check for corrupt files and try to fix them using System File Checker. SFC scan is an inbuilt Windows 10 tool, which searches and fixes corrupt system files. Corrupt files are one of the reasons behind the error. Follow the steps to perform this method.
Step 1. Open Command Prompt as Administrator. To do this, go to Cortana and type Command Prompt in the search area. Now, right-click on Command Prompt from search results and select Run as administrator. When prompted with a dialog box to confirm if you want to open Command Prompt in Admin mode, select Yes button.

Step 2. Now, in the Command Prompt window, type following command and press Enter.
sfc /scannow

After performing the last step, now you just have to wait for the command to finish its process. The process may take more than 15 minutes, so you will have to be patient. When the SFC is done scanning and fixing the corrupt files, restart your computer.
If this method didn’t work for you and you are still stuck with the error, perform the next method.
Fix 5 – Perform DISM Scan
DISM or Deployment Image & Service Management scan is an inbuilt Windows 10 troubleshooter tool that searches and fixes corrupt system files. DISM fixes the corrupt files which SFC Scan wasn’t able to fix. Follow the steps to perform this method.

Step 1. Open Command Prompt as Administrator. To do this, go to Cortana and type Command Prompt in the search area. Now, right-click on Command Prompt from search results and click on Run as administrator. When prompted with a dialog box to confirm if you want to open Command Prompt in Admin mode, select Yes button.
Step 2. The last step will open the Command Prompt window. Now, in the Command Prompt window, type the following commands, one by one, and press Enter after typing each command.
Dism /Online /Cleanup-Image /CheckHealth

Dism /Online /Cleanup-Image /ScanHealth

Dism /Online /Cleanup-Image /RestoreHealth

Step 3. Let the scan complete its search and fix operation. This could take up to 20 minutes, so be patient.
Step 4. When the process is done, Restart your computer.
This should fix the problem.
Fix 6- Alternatively Download and Use RSAT (Remote Server Administration Tools)
1. Go to this link from Official website of Microsoft
2. Click On download and choose your windows version.
Note: If you do not know your version of windows, just press windows key + r together to open run and write winver in it. Click OK.

We hope we were able to help you fix this issue. If you solved the problem using some other method, or if you have any questions regarding the issue, please mention them below in comments.