Sppsvc.exe is the executable name for Software Protection Platform Service. This is the licensing service for Microsoft software products.
Note: It is strongly recommended to use a genuine copy of Windows 10 for your system.
Cause
One of the main cause behind high CPU usage by Sppsvc.exe is that the copy of Windows might have been activated using a third-party software like KMS. Another case might be that associated Microsoft applications might be activated with software like KMS even if the copy of Windows is genuine.
If your copy of Windows is genuine yet the KMS is running in the background, it would interfere with the Software Protection Platform Service this causing high CPU Usage by Sppsvc.exe.
If we disable the Software Protection Platform Service, the system would display an Activate Windows watermark on the bottom-right corner of the screen and users might face other issues as well.
Preliminary steps
1] Update Windows just in case it’s a known bug for your system and Windows rolls out an update to fix it. Here’s the procedure for updating Windows.
2] Scan your system for virus and malware.
Thereafter, try the following solutions if they help resolve the issue:
Recommended read: Fix: Microsoft Software Protection Platform Service high CPU usage in Windows PC
Solution 1] Disabling the Service (sppsvc) through Registry Editor
In case all of the above steps have failed,you might consider disabling the Software Protection Platform Service. While doing so would start displaying the Activate Windows watermark on the right-bottom corner of the screen, it would make the system usable (which is currently slow due to high CPU usage).
Note: Please backup your system prior to attempting any Registry Level fix.
1] Press Win + R to open the Run window and type the command regedit. Press Enter to open the Registry Editor.
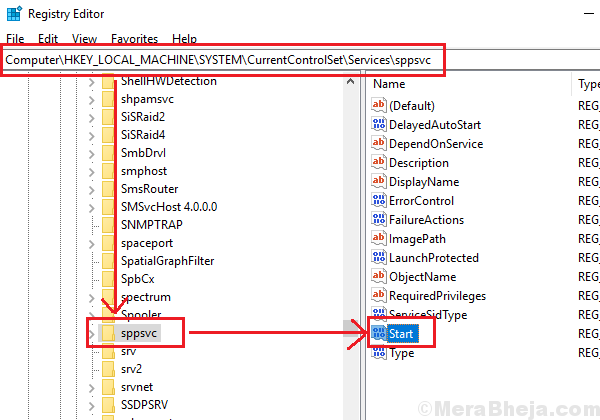
2] Navigate to the following path:
Computer\HKEY_LOCAL_MACHINE\SYSTEM\CurrentControlSet\Services\sppsvc
3] On the right-pane, double-click on Start and change the value of Value data to 4.
4] Click on OK to save the settings.
Solution 2] Stop the Software Protection service
1] Press Win + R to open the Run window and type the command services.msc. Press Enter to open the Service Manager window.
2] Locate the Software Protection service. Right-click on it.
3] Select All Tasks >> Stop.
We hope this exhaustive list of solutions would be helpful in resolving your issue.
Solution 3] Run the System Maintenance Troubleshooter
The System Maintenance Troubleshooter, unlike most other troubleshooters isn’t present in the Settings menu. We would have to run it through the Control Panel.
1] Search for Control Panel in the Windows search bar and open it.
2] Go to Troubleshooting >> System and Security.
3] You would find the System Maintenance troubleshooter in the list. Click on it and run it.
4] One the troubleshooter has done its job, restart the system.
Solution 4] Check the issue in Safe Mode and then perform a Clean Boot on the system
1] Restart your system in Safe Mode. The procedure to boot a Windows 10 system in Safe Mode has been explained here.
2] Check the Task Manager if it still shows high-CPU usage due to the Sppsvc.exe process.
3] If the Disk Usage is still high, move to the next solution.
4] If not, probably the issue was due to some Startup program or driver. In such a case, a Clean boot could be helpful in resolving the issue. Here’s the procedure for a restarting a PC in clean boot.
Solution 5] Run an SFC scan
An SFC scan checks the system for missing or corrupt files and if any such abnormalities are found, it replaces the files. Here’s the procedure for an SFC scan.
Solution 6] Update the KMS software on your system
Download and update the KMS software on your system so that it doesn’t interfere with the Software Protection Platform Service.
Solution 7] Disable the programs installed through KMS
1] Search for Task Scheduler on the Windows search bar and open the option.
2] Upon expanding the Task Scheduler library you would find the KMS.
3] In the right-pane, it would show the list of applications enabled through KMS. Right-click and elect disable for the applications.


