The issue of mouse and other peripheral devices not working after unstable features Windows Updates is not uncommon. However, the Windows Update 1809 (October update) has been one of the most troublesome ones. Many users have reported that the mouse connected with their systems ceased to work after Windows Update 1809.
Mouse not working after Windows Update 1809
Cause
The most probable cause behind this issue is that the drivers went bad after the update. However, there could be many other causes.
Preliminary step
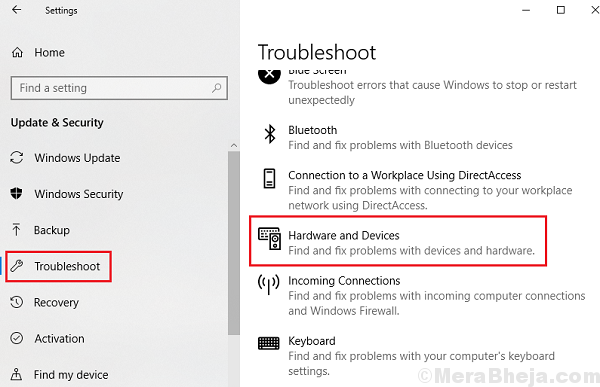
Run the Hardware and Devices troubleshooter: Go to Settings >> Updates and Security >> Troubleshoot. Select the Hardware and Devices troubleshooter from the list.
After this, proceed with the following solutions:
Solution 1] Update the mouse drivers (and USB controller drivers)
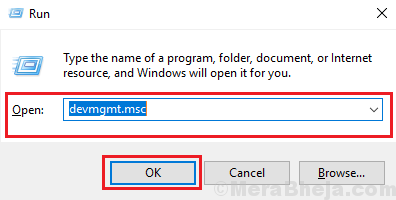
1] Press Win + R to open the Run window and type the command devmgmt.msc. Press Enter to open the Device Manager.
2] Use down arrow to go to and use right arrow key to Expand the list for Mice and other pointing devices.
3] Press the Right-click key located on the keyboard , once you reach mouse driver.

Now, Click on Update driver.
4] Restart the system once done.
We could also try updating/reinstalling the USB controller drivers.
Solution 2] SFC scan
An SFC scan helps replace system files which must have gone missing or corrupt after the troublesome Windows Update. A corrective update cannot replace those files, however an SFC scan can. Here’s the procedure for an SFC scan.
Solution 3] Disable USB selective suspend setting
1] Press Win + R to open the Run window and type the command powercfg.cpl. Press Enter to open the Power Options window.
2] Click on Change plan settings corresponding to your current plan settings.
3] Select Change advanced power settings.
4] In the list of Advanced settings, expand USB settings and then expand USB selective suspend setting.
5] Change the values to Disabled for both Battery and Plugged in mode.
6] Click on Apply and then on OK to save the settings.
Solution 4] System restore
A system restore could be helpful in replacing the missing files in case the SFC scan wasn’t sufficient. Here’s the procedure for a performing a System Restore.
Solution 5] Roll back Windows Update 1809
If everything else fails, we could try rolling back the unstable Windows Update 1809. Here’s the procedure for the same:
1] While keeping the SHIFT button pressed, click on Start >> Power >> Restart. This would reboot the system in Recovery mode.
2] Go to Troubleshoot >> Advanced Options.
3] Select Go back to previous build.
4] If it prompts for log-in credentials then enter the same.
5] Now select Go back to previous version once again.


