Windows 10 spotlight Pictures are loved by many windows 10 users, but recently some users have reported that the spotlight pictures on the Lock screen are not changing anymore. They have no idea or clue why they have stuck indefinitely on a particular picture and not changing anymore.
Fix 1 – Disable and Enable Spotlight again
1 – Press Windows and I key to open setiings
2 – Click on Personalization
3 -Click on Lock screen from left menu.
4 – Choose Slideshow or Picture Under Background

5 -Now, Close the settings and Restart your PC.
6 -Now, Once the PC starts again, Follow the exact same steps shown above and choose Windows spotlight this time.

Fix 2 – Empty Assets Folder and Try again
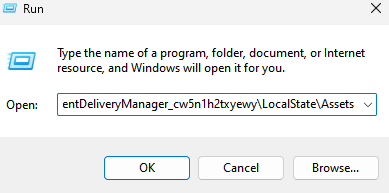
1 – Open RUN command box by hitting Windows and R key at once.
2 -Copy and paste the path given below in the run command box and click OK.
%USERPROFILE%/AppData\Local\Packages\Microsoft.Windows.ContentDeliveryManager_cw5n1h2txyewy\LocalState\Assets

3 – Now, Select and delete all the files inside Assets folder.

4 –Restart your PC
Fix 3 -Reset Spotlight settings
1 – Open RUN command box by hitting Windows and R key at once.
2 -Copy and paste the path given below in the run command box and click OK.
%USERPROFILE%/AppData\Local\Packages\Microsoft.Windows.ContentDeliveryManager_cw5n1h2txyewy\Settings
3 – Now, Rename Both files (Romaing.lock and Settings) by adding a Backup at the end. They will be recreated when you restart your PC.

4 – Restart your PC and try again.
Fix 4 – Using Powershell and Registry editor
1. Click on start button and then click on Gear shaped icon to open settings.

2. Now, Click on Time & Language.

3. Click on Region from Left menu and then select United states in Countries or region list.

4. Now, in settings panel click on personalization.

5. Now, click on Lock screen in the left menu.
6. Now, Choose Picture as background from the dropdown list in the right.

7. Now, go to explorer and copy and paste the path given below to address bar.
C:\Users\%username%\AppData\Local\Packages\Microsoft.Windows.ContentDeliveryManager_cw5n1h2txyewy\LocalState\Assets

8. Delete all the files in the folder. Do not worry , they will be recreated automatically.

9. Search powershell in the windows 10 search box and right click on powerhshell icon and choose run as administrator.

10. Copy and paste the command given below in the powerhsell window and hit enter to execute the command.
Get-AppxPackage -allusers *ContentDeliveryManager* | foreach {Add-AppxPackage "$($_.InstallLocation)\appxmanifest.xml" -DisableDevelopmentMode -register }
11. Search regedit in windows 10 taskbar search and click on the registry editor icon to open it.

12. Browse to the following location in the registry editor.
HKEY_LOCAL_MACHINE\SOFTWARE\Microsoft\Windows\CurrentVersion\Authentication\LogonUI\Creative
13. Delete everything you get after expanding Creative leaving only s-1-0-0 folder.

14. Restart your computer.
15. Now, Go to Settings > Personalization > Lock screen again.
16. Select Windows spotlight.

17. Now, your Lock screen will keep changing windows spotlight pictures. It will take some time for files you deleted ins step 8 to get created automatically.