When you have more than one computer on the same local network, it is very easy for you to access or share files from one computer to another. But, when you are trying to share your files you are denied with a prompt ‘Your folder can not be shared’. No need to worry because you are not alone facing the same issue. Many Windows 11 and windows 10 users are reporting to face the same issue. This error generally happens when you don’t have permission to share the files or in many cases it may happen that there is a problem with password protected sharing.
Before going ahead to the fixes you should attempt this small work-arounds and check if your problem is solved or not-
1. Disable your antivirus temporarily. Sometime antivirus blocks local network sharing. Check if you can transfer your files without the error.
2. Check your Internet connectivity on both of the computers.
3. Restart your computers and attempt the sharing for one more time.
4. If you have virtual machine installed on your PC, just disable Virtual Machine network adaptor .
If any of these didn’t work for you, go for these fixes.
Fix-1 Change Folder permission-
Changing the folder permission can solve the problem of sharing folder with another computer. Now, to give full control to every user follow these steps-
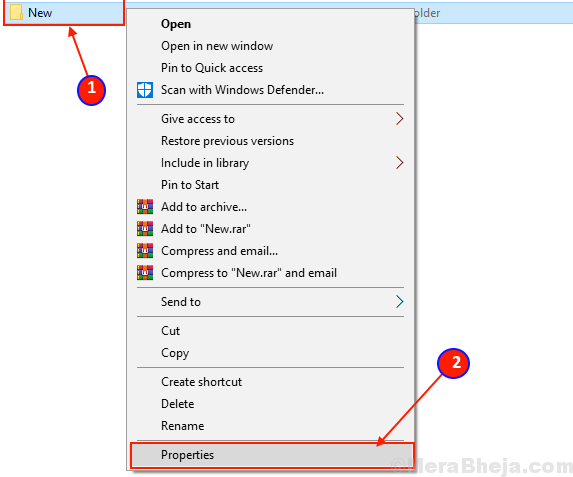
1. Go to the location of the folder you want to share. Right click on the folder and click on “Properties“.

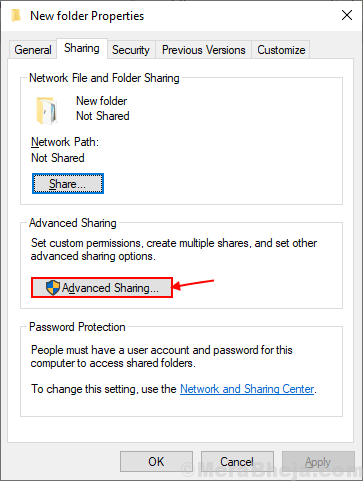
2. Now, go to the “Sharing” tab and click on “Advanced Sharing” option.

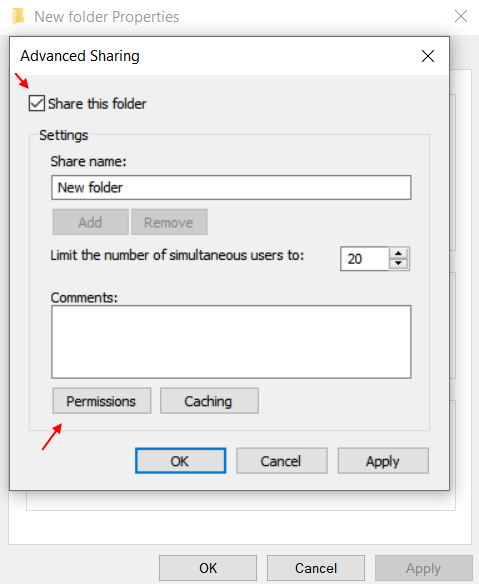
3. Now check option “share this folder“.
4. After that, click on permissions.

[For allowing “Everyone” can share the folder]-
To allow Everyone access of your folder, follow these steps-
1.Check all the boxes of “Allow” to allow ‘Full control’, ‘Change’ and ‘Read’ settings of the folder. Now click on “Apply” and then on “OK“to save the changes.

Now check if you can share the folder without any kind of error.
[For allowing individual user can share the folder]-
To allow specific who can share your folder follow these steps-
1. Click on “Add” on the Security settings.

2. Now, click on the “Advanced“.

3. Now, in Select Users or Groups window click on “Find Now” and select your username from the ‘Search results’ box. Now, click on “OK“.

4. Now, you will be able to see your selected username in the ‘Enter the object name to select’ box. Click on “OK“.

5. Now, select the username under the “Permission” section, then check all the box in ‘Permissions for <your username>’ under “Allow” for ‘Full control’, ‘Change’ and ‘Read’ settings. Click on “Apply” and “OK” to save the changes.

6. Close the Properties window and reboot your computer.
Check if you can share your folder with the computer on your local network. If the problem is still not solved, then go for the next fix.
Fix-2 Turning off Password Protected sharing-
Sharing,accessing or transferring the files from another computer to your computer on the same network requires password. Turning “Password protected sharing” OFF can solve the ‘Your Folder can not be shared’ error. But before going ahead to the steps of the process, let’s be clear that Password protected sharing is the safest way to transfer your files or to access your local network. Removing the password protection can make your computer vulnerable to other users on the same network.
Follow these steps to turn off “Password protected sharing” –
1. Press Windows key +R to open Run. Copy and paste this line control.exe /name Microsoft.NetworkAndSharingCenter /page Advanced and hit Enter. Advanced Sharing settings window will open.

2. In Advanced Sharing settings window, click on “All Networks“.
Select Turn on Sharing option.
Under “Password Protected sharing” option, select “Turn off password protected sharing“. Click on “Save Changes“. If you are prompted for permission by User Account Control click on ‘Yes’.

Close Advanced Sharing settings tab. Restart your computer and try to reconnect. If the issue still persists go for the next fix.
Fix-3 Turn ON file and printer settings-
Sometime it may happen that you are facing this problem because your network profile is denying the file and printer sharing. Turning On the file and printer sharing ON can solve the problem. Follow these steps-
[NOTE: It is recommended from our end, that you should change this setting when you are on ‘Private’ network only]
1. Press Windows key +R to launch Run, and copy and paste “control.exe /name Microsoft.NetworkAndSharingCenter” and hit Enter.

2. Now, on the left side click on “Change Advanced sharing“. It will open Advanced sharing settings window.

3. Now, in this window click on “Turn on file and printer sharing” and click on “Save changes“. Click on “YES” if you are prompted for permission by User Account Control.

4. Close the Control panel window, and restart your computer.
Check if you can transfer your folder.