FAT stands for File Allocation Table. FAT32 file system is a traditional file system for organizing data in the hard drives. This file system used allocation tables to provide mapping between clusters pointing to the physical structure of the hard disk.
NTFS stands for New Technology File System. This file system was made to enhance security and privacy in the hard drives. NTFS included certain features which supported larger hard disks much better than FAT32 file systems. The error handling mechanism in NTFS was also much better as compared to FAT32.
Recommended: – How to create a Partition in Windows 10
As Windows now recommends NTFS over FAT32 file systems, this article will guide us through the following steps on changing FAT32 to NTFS file system in Windows 10:
Step 1:
Click on “File Explorer” icon pinned on Windows Taskbar.

Step 2:
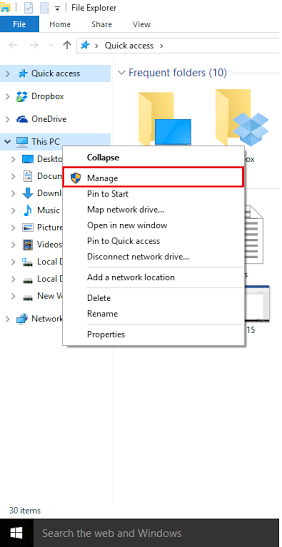
Look for “This PC” in the left corner of the screen. Right click on “This PC” and click on “Manage”. This will open “Computer Management” window.

Step 3:
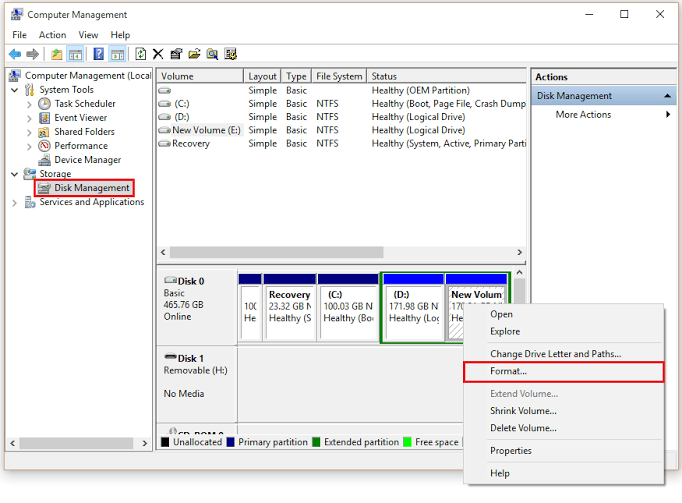
In the left corner of the screen, look for “Storage”. Under “Storage” section, Click on “Disk Management”.
Disk Management lists important figures such as Volume (Disk) name, Layout, Volume Type, File System and Health Status of the disks.
In the lower section of Disk Management, select a hard drive (FAT32) which you need to convert in NTFS file system. Right click on the desired hard drive and click on “Format”.

Step 4:
In “File system” section, select “NTFS” from the drop down list. Click on “OK” to format your selected drive.

Step 5:
A confirmation dialog box will display on the screen which says “Formatting this volume will erase all data on it. Back up any data you want to keep before formatting. Do you want to continue?”.

Click on “OK” to confirm your changes.
Note: Your selected hard drive will format and convert itself into NTFS file system.