Do you want to edit screenshots directly after you capture it? Do you want to make changes like marking or sketching on the image? ‘Snip & Sketch’ is an application in Windows 10 that helps the user to take a screenshot of their current screen, and they can even make changes into the app settings to take the screenshot after few seconds, and apart from normal screenshot, it allows you to make a selection of which part you want a screenshot from the screen. Further, it also includes the customization for the pen type, ink color, and size of the pen. You can also copy, save and share your edited image. Here is a how-to tutorial for guiding you about the use of Snip and Sketch features and also mentioned some of the Tips and Tricks of this app.
NOTE: This app is the modified version of the ‘Snipping Tool’.
How to Open Snip & Sketch
First of all, open the document or menu or the thing you want to snip. and then select any of the following options to open the app.
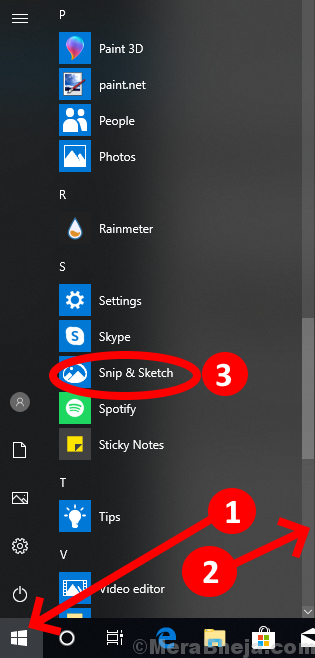
The First Way to open snip and sketch is to click on the Windows icon and then scroll down the menu and click on the snip & sketch option to open the application.

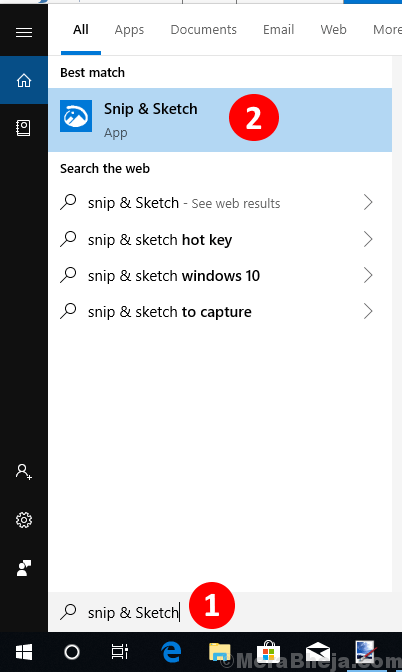
The Second Way is to search for Snip & Sketch in the search box and then click on the app to open it.

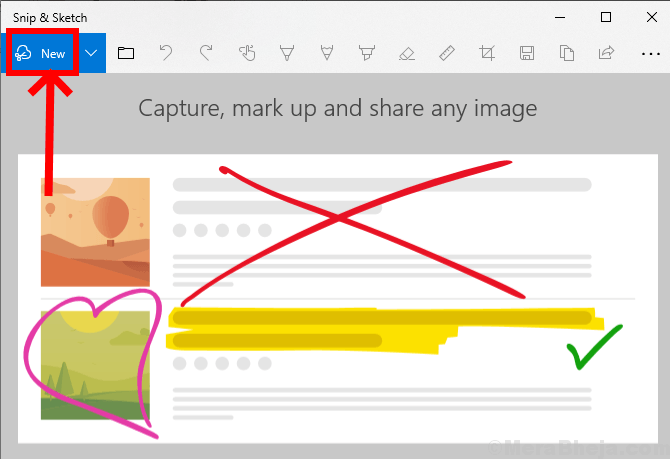
Now a Snip & Sketch app will appear on your screen. To take a screenshot of the screen for editing click on the ‘New’ on the top left corner of the app.

You can view that your screen is dimmed and snipping tools are displayed on the top of the screen.

Here, you can choose the type of snip you want to use and then release the cursor.
1. Rectangular clip: It allows you to draw a rectangle for the specific area you want to snip.
2. Free-form clip: Allows you to snip the area in free form and use it for editing.
3. Full-screen clip: Allows you to take a snip of the full screen for further editing.
You will be redirected to the app and your snip will be ready for editing.

Tips and Tricks to use each tool and option
1. How to delay the snipping time.
On the top left corner, besides ‘New’, you will find a drop-down arrow that has the option to delay the snipping time. This can be used if you want to take a snip after 5 or 10 seconds of the command given to snip the screen.

2. How to choose the image from your saved files.
You can also edit the image you want from your saved images on your device. Select the ‘Open file’ icon situated on the top left side and then select the image you want to edit.
You can also click ‘Ctrl+O’ from the keyboard to open your folder.
3. How to Undo/ Redo the editing
You can Undo or Redo your editing made in the app by clicking on the anticlockwise arrow or clockwise arrow respectively.
To Undo your editing you can also press ‘Ctrl+Z’ on the keyboard.
Similarly to Redo the editing you can press ‘Ctrl+Y’ on the keyboard.

4.how to use Touch writing
You are able to write anything you want on the image by selecting ‘touch writing’ with a touch screen, but if you don’t have a touch screen then you can also use the mouse cursor to write.
You can also enable or disable this Option by pressing ‘Alt+T’ on the keyboard.

5. How to use the Writing tools
You can write or highlight on the snip by selecting any of the three writing tools:
1. ballpoint pen 2. pencil 3. highlighter
You can also use the shortcut keys to select any of these tools. For Ballpoint pen press ‘Alt+B’, for using pencil press ‘Alt+I’ and for highlighter use ‘Alt+H’ key.
By selecting the drop-down arrow or by double tap on the icon, you can customize the color and size of these tools.

6. How to erase the editing
By selecting the ‘Erase’ icon from the top middle menu, you can erase the editing by moving the cursor on the area of snip you want to erase.

7. How to use ruler/ protector
The ruler is used to draw a straight line and you can also use the protector from the drop-down menu to draw an arc or a pie from a certain angle.


8. How to Crop the Image
By clicking on the ‘Crop‘ icon, you can crop the image after selecting the portion you want to crop and then press enter on the keyboard.


9. How to save, copy and share the snip
After you finish your editing, you can ‘Save’ your editing in .jpg, .png and .gif. by selecting the save icon on the top right menu.
The shortcut key to save the snip is ‘Ctrl+S’ from the keyboard.
You can also ‘Copy’ the image to clipboard for pasting it into another document by selecting the copy icon from the top right menu.
You can click on the ‘Share’ icon to share the image by e-mail or any other displayed application.

10. How to print the image
You also have the option to print the edited image. click on the menu on the top right corner of the app and select print and then select the printer connected with your device.
Alternatively you can also use the shortcut key ‘Ctrl+P’ from the keyboard to print the image.

11. How to open the image into another image editing application
If you want to make further more editing, then you can select ‘Open with’ from the menu on the top right corner and select the application that you want for editing the image.

