Suppose that you manage multiple email accounts. Say, one for your college activities, one for the official purposes, and one that is simply created to share fun with friends. You might open them up on different computers at different times to keep track of your mails. But it is a hectic task to remember which accounts were logged in at what times on which machines. Also, you need to keep your email secure against the curious spies. In such cases, wouldn’t it be cool to have your Windows system notify you whenever someone logs on to your account?
See also : How to turn on email Notifications with sound in windows 10
Let me take you through the steps you need to follow to accomplish this purpose. Before that, let us have a quick look on what SendMail is.
SendMail is a lightweight command line email program that can send emails and notifications. It is a general purpose email routing utility that is capable of supporting wide range of mail transfer protocols like Simple Mail transfer Protocol (SMTP) and their corresponding delivery methods.
STEPS TO MAKE WINDOWS NOTIFY YOUR MAIL ACTIVITIES
STEP 1
- This is going to make use of an program SendMail that need to be downloaded. You can download it from here – SendMail . What makes SendMail different from all other programs of its type is that, it makes use of TLS(Transport layer Security). This maintains the privacy when your email is sent over the communicating network and secures it over unauthorized agents.
STEP 2
- Extract the file just downloaded in a safe place. It should be somewhere where no other person can access it directly and must have admin privileges.
I have extracted it into my S drive as shown in the screenshot above.
STEP 3
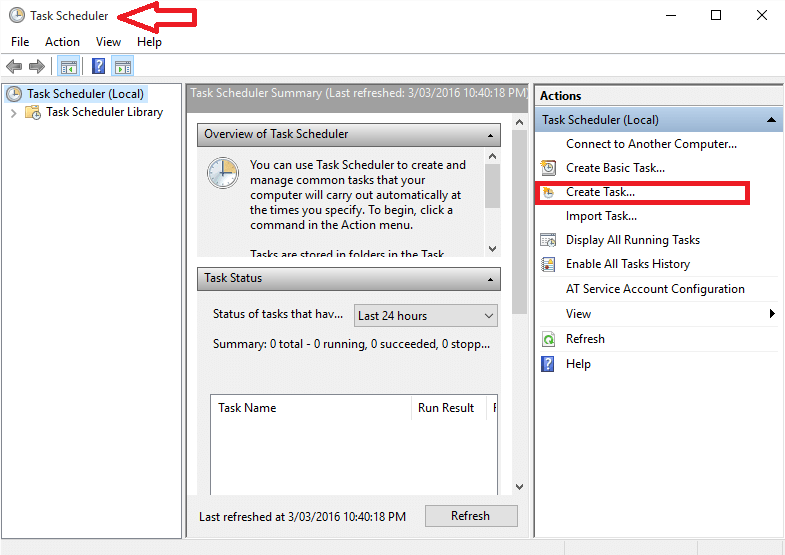
- Open up the Task Scheduler by searching for it in the Start Menu. Click on the option Create Task on the right pane of the window that opens up.
STEP 4
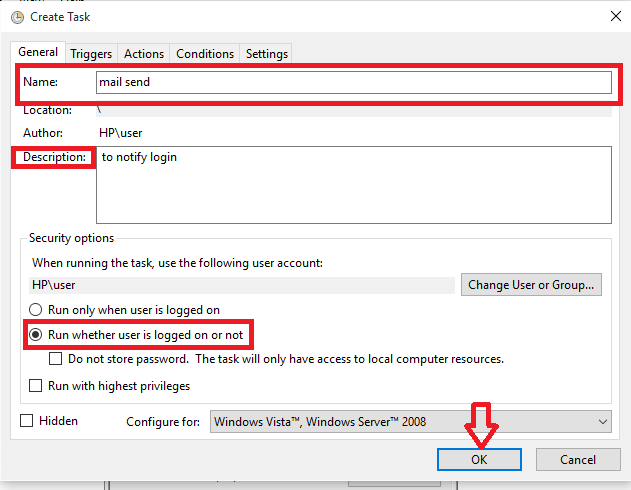
- On the new window that pops up, apply a name to the task you create, add a new description for it and click on the radio button that appears to the left of the option Run whether user is logged on or not.
STEP 5
- Now move on to the Trigger option that appears as the second tab on the top menu. Click on the option New that appears to its bottom.
STEP 6
- On the window named New Trigger that pops up, choose the option At Log On by selecting it from the drop down menu just next to Begin the task.
- Select the radio button before the option Any User below the Settings tab.
STEP 7
- Now, move on to the Actions Tab and again click on the New button. In the window that pops up as shown below, enter the path of your SendEmail application next to Programs or Script field and type the command as given below in the text box next to Add Arguments field.
-f [email protected] -t [email protected] -xu [email protected] -xp PASSWORD -s smtp.gmail.com:587 -o tls=yes -u “System Login Activity” -m “A user logged into your system!”
In the command above, replace the [email protected] with your email address and PASSWORD with the actual password of your account.
Here, -f,-t,-xu, -xp, -s, -u , -m refers to from address, to address, username, account password, SMTP address, email subject and body respectively.
Click on the OK button once you are done.
STEP 8
- Move on to the Condition tab at the top, and unmark the option Start task only if computer is on AC power. This enables the notifications to occur even if your PC is running on battery.
- Click on the OK button once you are done with the whole procedure.
From now on, it notifies you whenever a login attempt occurs.


