Blue Screen of Death or commonly known as BSOD is a result of improper working of hardware (in some cases it may be due to hardware failure) or malfunctioning of hardware’s driver software.
In some critical cases, reinstallation of windows becomes mandatory whereas in most cases there is no need to reinstall windows.
Read: How to Fix Black screen of Death error
Whenever there is a BSOD in your system, Windows automatically generates a minidump file. The minidump file is simply a log file which contains specific codes that are responsible for crash within the system. The files are stored under the minidump subdirectory i.e. C:\Windows\Minidump
In this article, we’ll discuss the methods to fix blue screen of death in Windows 10:
Using System Restore
Restore Points are available on your system if the system protection is turned “ON”. Your computer automatically creates restore points with description of their created date & time. Following steps will guide you how to use system restore in Windows 10:
Step 1:
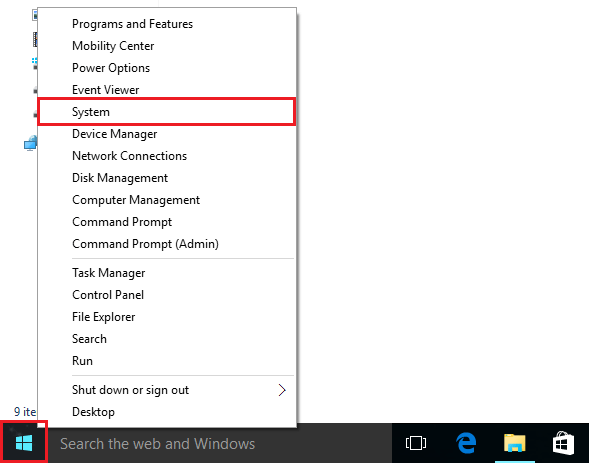
Right Click on “Start” icon positioned at lower left corner of the screen. Click on “System” to view “System Settings” window.

Step 2:
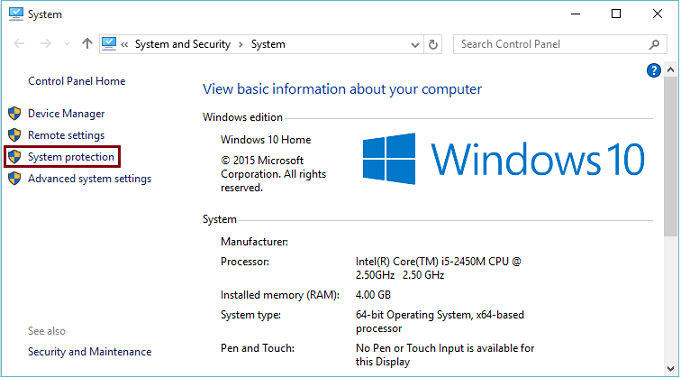
Click on “System Protection”.

Step 3:
Under, “System Protection” section, click on “System Restore”.

Note: System Restore will avoid any changes which are made currently. System Restore helps you revert back to a stage where your PC/Laptop was working fine without any hardware or hardware’s driver software issues.
Method 2: installing BlueScreenView Software and analyzing the cause

You can download and install the “BlueScreenView” software to determine the exact cause of BSOD. The link for downloading is http://download.cnet.com/BlueScreenView/3000-2094_4-10965136.html
After installing the software, you can click on “Advanced options” to load the minidump file and decipher the codes.
