All the tech savvy folk around the world probably know everything there is to know about WiFi hotspots and Ethernet connections, but here’s an article for those who need a little help figuring out how to create and access Ad hoc WiFi hotspots, as well as how to disable them when you’re done with your work.
First of all, Ethernet refers to a system of a number, or rather a group of computer systems connected to form a LAN (Local Area Network) and sometimes MANs (Metropolitan Area Network), along with protocols monitoring the transfer and exchange of information, and attempting to avoid cross-interference in transmission by two or more systems. Just as Internet happens to be a worldwide network, Ethernet is basically a LAN enabling easy transfer of files across a distance.
Recommended: 5 Free wi-fi Hotspot softwares
An Ethernet connection is really useful for creating and using an Ad Hoc WiFi hotspot. There are two basic types of WiFi connections- permanent, and temporary. While most WiFi networks are permanent- that is, they run in Infrastructure mode, some connections are better off as Ad Hoc, i.e. temporary, because Ad Hoc networks don’t need a central point of access, and that can be really convenient when one isn’t at home or when a centralized access point is not available.
How to create an Ad Hoc WiFi hotspot for Windows 10
A key requirement for running an Ad Hoc WiFi is that the user’ device must be running Windows 10.Also, of course, an Ethernet connection is needed.
Along that, certain drivers may be needed, without which the Ad Hoc facility will not be provided to the user. This can be checked through the Network Sharing Center and seeing if adhoc network is written along with “Set up a broadband, dial-up…” under the heading “Set up a new connection or network”. If adhoc is not present, the necessary drivers need to be installed.
The creation of Ad Hoc WiFi will work on PCs, tablets, laptops as well as Windows phones. Here’s a breakdown on the process of creating an Ad Hoc WiFi hotspot for Windows 10:
Step By step process for creating Ad-hoc wifi Hotspot
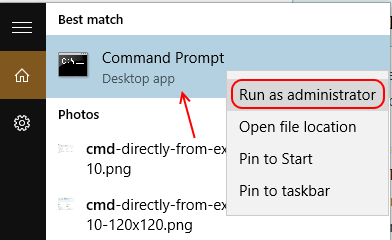
Firstly, the user needs to search CMD in the search box of taskbar and right click on it and run it as administrator.

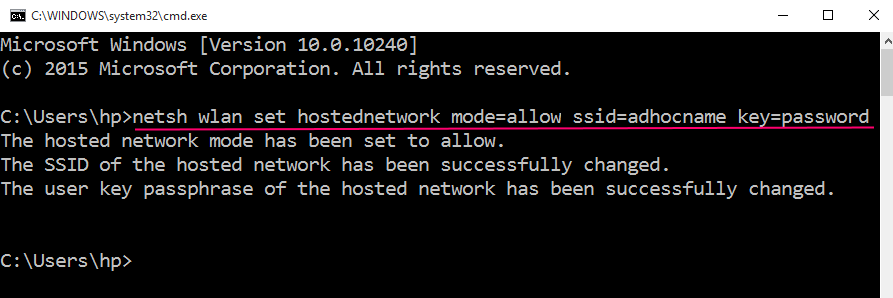
This is the command the user has to type to create Ad-hoc Wi-fi Internet Connection:
netsh wlan set hostednetwork mode=allow ssid=adhocname key=password
Note that you should replace adhocname with a name of your choice, this will be the name with which other devices will view the wi-fi connection available to connect. The password should be replaced a password of your choice which will be used to connect with the ad-hoc wi-fi connection.

Replacing adhocname by a name of the user‘s choice, and password by whatever password the user wants to set. (Naturally, the quotation marks used here to demarcate the extent of the command, will not be part of the command itself).
The next, and the last command will be: “netsh wlan start hostednetwork”.

Now Go to Network and Sharing Centre Then the user needs to right click on the Ethernet connection and choose Properties.

From here, the user can open the Sharing tab, under which two checkboxes will be displayed: “Allow other network users to connect through this computer’s Internet connection”, and “Allow other network users to control or disable the shared Internet connection”.

There will also be a dropdown list under a heading called Home networking connection. After checking the checkboxes (more importantly the first one), the user can elect the newly created connection from the dropdown, and click OK, thus enabling and running the Ad Hoc WiFi connection.
You can now go and connect with your phone or any other device supporting wi-fi to newly created ad-hoc connection.
How to Stop Ad-hoc wi-fi in windows 10
Disabling the connection is even simpler. The user can just open Command Prompt (Admin) once more, and type this command:
netsh wlan stop hostednetwork
The same methods of enabling and disabling Ad Hoc WiFi networks apply for Windows versions 8 and 8.1 as well, so users with devices running Windows 8 and 8.1 can relax and follow the above steps. However, the drivers required for the procedure to work may differ in other versions.
A word of caution for users setting up Ad Hoc WiFi hotspot, though: if the user shares his or her Internet connection after creating the network, any other user logging in to that device using Fast User Switching, will gain access to the network by default, hence it would be prudent to disconnect from the Ad Hoc network after it has been used to the user’s satisfaction.
How to Fix “The hosted network couldn’t be started” error
If you are trying to connect with the command netsh wlan start hostednetwork, sometimes an error message gets displayed in windows as shown below.
- The hosted network couldn’t be started
- The group or resource is not in the correct state to perform the requested operation.
To fix this error, just press windows key + r and then type devmgmt.msc in it and press enter.

Once the device manager gets opened, just click on view and check show hidden devices option.

Now, click on network adaptors from the list and then find Microsoft Hosted Network Virtual Adaptor.
Right click on it and then click enable.

Now, relax you have fixed the problem. Just open the CMD gain and enter same code netsh wlan start hostednetwork. It will start without any problem.

How to Check if Your PC supports Ad-hoc connection or Not
First of all open command prompt and enter the line given below.
netsh wlan show drivers
Now, in the results obtained find the line which says, hosted network supported. If it says yes, your computer supports ad-hoc connection.
