There are many mind-blowing video editing softwares out there, but the problem is that all of them cost you a fortune if you plan to buy them. Now, a person faces the dilemma that what if after paying the money, it will cater to his needs or not. Here comes, VSDC, the best free video editing tool with features like Chroma, zoom effect etc. It has a slight bit of learning curve, but i have compiled all the things it can do in this article.
Choose the required resolution of the video initially
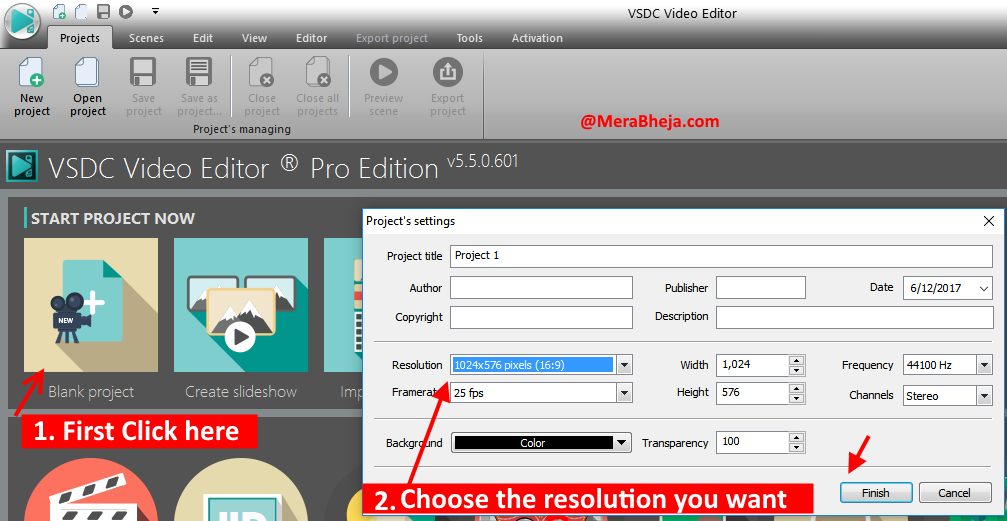
At first, when you will open the VSDC Editor, click on the Blank project. A pop-up window will come up which will let you choose frame rate per second, resolution, frequency, project name etc. You can leave other things as default, but please do not forget to choose the resolution. Otherwise, the default video resolution is here set to be low and hence your final video quality will not be good. As I make videos for youtube, I keep 1280×720 resolution.

Understanding the VSDC editing interface
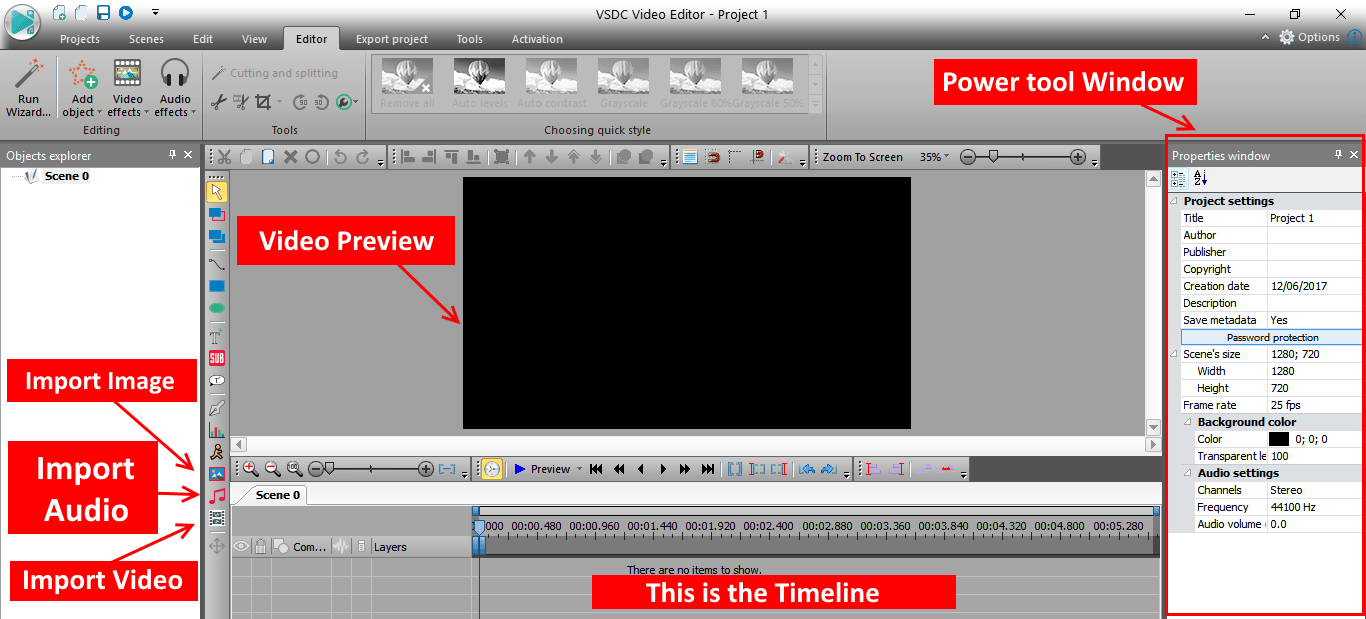
Now, when the editing interface, in the left side a thin bar contains all the links to import video , audio and image file into the editor. In the central area, is the preview area of the video editor, where you can play the preview of the video while editing. In the right side there are various power tools, with which you can do various operations like changing the speed, zoom effect, changing audio volume etc.

Splitting the video or audio file
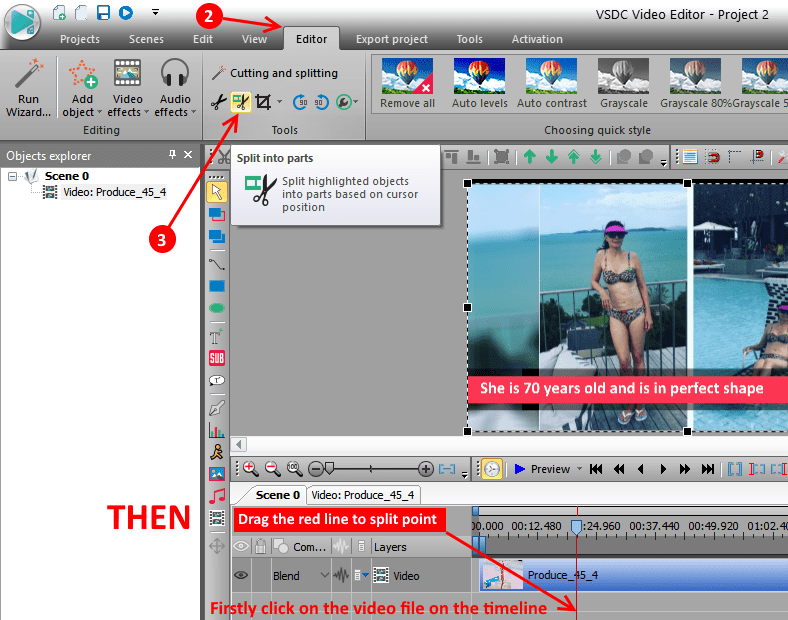
Just select the video file in the timeline, drag the red line in the timeline to the point, where you want to split. Then click on editor tab given at the top. Now, click on the split into parts ( scissor icon ) as shown in below pic. The video file will get split into one break point. Now, Similarly, put the red cursor at any other point, and then click on split video icon again to split there also. Now, if you want to remove this middle split part, then click on the split part and then press delete in the keyboard to remove it.

Separating video from audio
Now, sometimes we want to mute original audio or lower or its volume. If this is the case, just select on the video file in the timeline, then, scroll down the right side power window to its bottom. Now, at the bottom, there is one option saying, split to video and audio. Just click on that, and the video and audio will be separated in the timeline. Now, you can do any operation on this audio file.

Removing background using Chroma in VSDC
Select the video file in the timeline, now click on Video Effects -> Transparency -> Background Remover.
Now, once the background is removed, just import any other video or image in the timeline to change the background.

Change video styles , just like instagram filter effect
You can change the video style and apply a filter like grayscale, sepia etc by choosing the required style.

Change video speed from Right side Power menu
You can change the video speed via right side menu. From example, if you want to make a part of the video to double the speed, split the required part and then click on the split part, select it and then change the video speed to 200%.

Make audio volume lower or higher
You can change the audio volume by making it lower or higher. First, split the video and audio, then click on the audio file and then after selecting it, just change the audio volume from the right menu.

Adding text to the video
Just take the red line to the point from where you want to put text on the video. Now, click on the left tool menu and then click on add text icon and then click on the text box created and type the text inside it. You can drag its corner to make it bigger or lower and you can also change its position by dragging.

If you are a free user Disable Hardware Acceleration option
This is important. Before exporting the project as the final output file, you must disable hardware acceleration option, as VSDC will not export the project. To disable hardware acceleration, just click on settings -> acceleration options and uncheck the option saying use hardware acceleration for encoding video.

Export project for the output Video
Finally, Click on Export project for the output video. You can selet the various formats of the video in which you want the output. Also you can click on change name to change the output directory of the result file.
